Feeds:
Posts
Comments

This quilt was so fun to design and make!

AF43A6B7-CA36-4B89-A339-C7E6E95D84DE_1_201_a

I love looking at antique quilts…

and I love to play around with designs on my little graph paper notebook.

F0723C0B-3438-48E8-BEBB-371190C727D3

I saw a beautiful quilt from the late 1800s with this star pattern done in just blue and white.  I really want to make it that way some time this year, but for now, I wanted to make it in red/white/blue colors.
I used beautiful fabric from Minick & Simpson that I had been keeping for a while.

A7AAD99F-7829-4921-98D1-DFC5AF3D1AC7

The half-square triangles were squared to 3″ before sewing together.  That part was not fun but it really, really helps to make lining up the corners easier, and it looks so much better!  I used to skip this part but I learned the hard way that squaring up  those HSTs really makes a big difference.

I love how it turned out.

Now I just have to get it ready for hand quilting.  Not sure which patterns to use for hand quilting…  Any suggestions?

Happy quilting,

Daisy

A time to sew

I’ve been working on finishing up a stack of WIP’s I’ve had for a while…

E8A35C41-2537-4CFA-8C9A-C294F4E47774

.

It’s been fun to work on this quilt that I pieced together sometime last year…

.

C4F5CB4B-6E1E-4EBE-A876-4A6EE3AF5063

.

I used Bonnie & Camille fabrics that I had saved.  They’re so pretty and colorful!

.

B5A35269-4BF6-47EE-B15B-ADD87705165E

.

This is a very easy pattern, and it comes together quickly!

.

94111623-493C-4465-BF68-E1BB193A88CA

.

The pattern I followed is called “Katie’s Quilt, by MissiouriQuiltCo.com
You can find a great tutorial on Youtube by clicking  here

.

53DC251C-BDCB-4542-8FC0-64590DC06954

.

I’m so glad I chose a different background than the white I always use.  It’s much more colorful and fun.  Instead, I made the stars white, and the background a pretty shade of turquoise.  I also love the patchwork look in the squares.

.

2DBB9E4F-4A33-4746-9E3A-A759BF34B746

.

I finished to quilt top and now comes the hand quilting and then the binding.
If you have any suggestions for the hand quilting pattern, let me know.

.

AADF104E-A53A-47B9-9CCA-02CD429E8DA5

It was such a quick and fun pattern to follow that I might just make one to keep.  This one will probably be a gift.

Have a blessed Sunday!

Happy sewing,
Daisy

.


Sewing With Knit

IMG_8298

.

One of the things I get to do is sew for my grand kids and it’s so much fun!   Choosing fabrics I think they’ll like, and outfits that will not only be practical, but also fun for them to wear – that’s also part of the fun.

.

IMG_8299

.

I hadn’t sewn with knit fabric for a long time.  My serger was not working properly and I didn’t want to even try doing it with my regular sewing machine.

But it started getting colder and I found some great deals on knits, so I decided to give it a try (on my regular machine), and see if I could get some of these fabrics sewn into outfits that the kids would enjoy.

.

IMG_8261

.

This cute fabric was perfect for this pattern, and sewing it together was easy and quick.

I used the zigzag stitch on all the seams.

.

IMG_8263IMG_8262

.

.

IMG_8264

.

It was such a quick and easy project that I decided to make another using a pretty, soft flowery fabric.

IMG_2714

.

.

IMG_2715IMG_2717IMG_2716

I added lace to the hem of the top for a touch of softness and because I knew my granddaughter would love it!

.

IMG_8305

If you haven’t tried sewing with knit before, or if you haven’t done so in a long time, give it a try!  I think you’ll be surprised at how easy and quick it is to work with!

Happy sewing!

Daisy

A brand new year!  Wow!

I think of what Anne Shirley said,
“Tomorrow is new, with no mistakes in it!”
(from Anne of Green Gables).

IMG_9610

I like to sew and quilt, but since I can’t take the sewing machine with me in the long car trips, I like to take something along that I can work on (when I’m not driving).

So, I’ve started a new crochet project.
I don’t know if it’s an early Christmas project (REALLY early), or if it’ll just be
a pretty red & white blanket.  I’ve done so many for different people,
but I haven’t made one for our home yet, so maybe this one is it??  We’ll see.

I’m using the With Love yarn, by Red Heart, and it’s going to be
a big granny square  (because that’s really all I know how to do!).

What are you working on?  Something new?
Or finishing up something from last year?
I have my own little stack of things I need to finish, too.

Happy New Year, friends!
And happy times with your hand crafts!

Daisy


Creamy Cuban Flan

This is the BEST FLAN you’ll ever have!!
I don’t say that lightly… I’ve had a lot of flan in my life
(I’m cuban, so I guess you can say it goes with the territory! Haha)

IMG_9542

I’ve had a lot of flan in my lifetime!  Some are too watery, others lack flavor…

But this recipe is by far the best one I’ve ever tried.

It’s delicious, it’s full of that vanilla flavor, and it’s so creamy!!

.

IMG_9543

It’s easy – only 6 ingredients!  Just put the first five ingredients in the blender,
and pour into prepared caramel sugar.

And I’ve got a no-fail tip on how to do the caramel sugar so that you don’t get
any lumps.  It works every time!

.

My cousin shared this recipe with me over 30 yrs ago!
I wrote it down on a 3×5 card and I still use it!

.

IMG_9535

I wrote it in Spanglish because that’s how she dictated it to me!

.

I made a big flan for my neighbors (in a cake pan), and placed it on a paper plate
to give to their kids for delivery.  They love it when I make food for them,
it’s so fun to see their expressions when they see me coming up the walkway!
.

IMG_9540

.

You can also make it in little oven-safe bowls.
.

IMG_9541

.

This is the creamiest flan you’ll ever taste!

.

IMG_9544

.

The little caramel floating around it and on top is the best part, of course!

.

IMG_9542

Here’s the recipe:

.

CUBAN FLAN

To make the caramel sugar:
Place 1 cup of granulated white sugar in a small heavy pot.
DO NOT add any water or anything else.
Place over medium-high heat.  Watch it closely, it will only take
a few minutes and can burn very quickly so do not walk away!
DO NOT stir until you begin to see a change in color at the bottom
of the sugar.  Once it begins to turn a darker yellowish color, then GENTLY
stir with a wooden spoon.  The sugar will very quickly begin to dissolve
and as soon as you see it turn a light brown, turn the heat off and stir
until completely dissolved.  Immediately pour into pan or bowls.
There is no need to butter or grease the pans.

FLAN  INGREDIENTS:
4 eggs
8 oz softened cream cheese
1 can sweetened condensed milk
1 can evaporated milk
1 tsp (or 2 if you like) vanilla extract

Place all ingredients in blender and blend until smooth.
Pour into pan with the caramel sugar.
Bake in a water bath at 350* for 45-50 min. if large pan,
30 min if small bowls.  You know it’s done by inserting
a toothpick (or small knife) in the center and if it’s clean,
it’s done.

Let it cool, but while it’s still warm run a knife all along the sides to loosen.
Carefully flip the flan unto a plate large enough to accommodate not just
the flan, but that wonderful caramel syrup that will overflow all around it.
Refrigerate a minimum of 3-4 hours.  I like to make mine the day before and
leave it in the fridge overnight.

NOTE:
Please Don’t be scared of baking with the water bath –
Just simply get a bigger pan, Place prepared pan with flan mixture
in the bigger pan.  I usually place this in the oven and THEN
very carefully pour hot water into the bigger pan and slide the
rack back into the oven.  Do not overfill the bigger pan with water –
just as long as it’s halfway up the sides of the flan, you’re fine.

…………………………………………
I sure hope you try this recipe because it’s a winner!

I’ve been making it for a long time and is a family favorite!

Let me know if you try it and how you like it!

Happy baking,

Daisy


I have been wondering for a while now, if it was possible to make cuban “pastelitos” at home as good as the ones in the bakeries I’ve been to in Miami…

If you’ve ever been to one of those bakeries, you know what I’m talking about.
There’s really nothing like it anywhere else.  I’ve tried them in many other cities,
but they’re just not the same… sigh…

I thought I’d try making some just for fun.  I had locked myself out of my house a couple weeks ago and the neighbors took me in, so I wanted to say thank you.  I was cooking a meal for them and thought these pastelitos would be the perfect dessert.

IMG_8250.
.

I’m so glad I did!  It was so much easier than I thought and they turned out pretty close to the famous Miami version.

You’ve got to try it!

.

IMG_8241

.

First thing you have to do is allow the Puff Pastry dough to thaw completely (but make sure it’s still cold).

Then make the simple syrup that will go on top by just boiling 1/2 cup of water with
1/2 cup of sugar then simmer for about 5-7 minutes.  Cool completely.

.

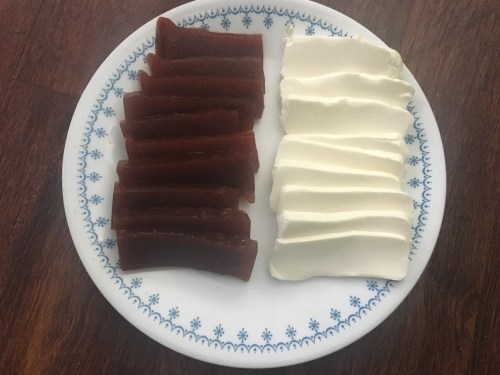
I bought some Guava paste (not the jelly or jam) and sliced it into about 1/4 inch slices.
I did the same with an 8 oz block of softened cream cheese.

fullsizeoutput_1b67

.

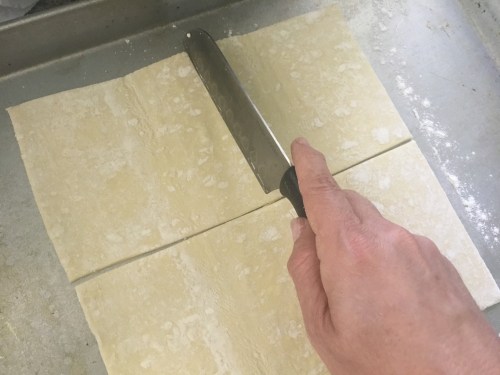
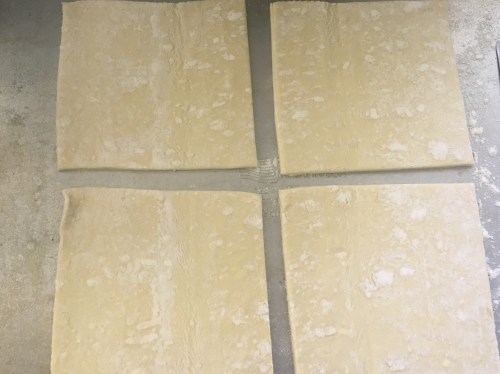
After the Puff Pastry thaws, cut each section into four equal parts.
(I had rolled a little bit where the folds were so that they wouldn’t come apart while cooking.)

fullsizeoutput_1b6a.

fullsizeoutput_1b70fullsizeoutput_1b6e

.

.

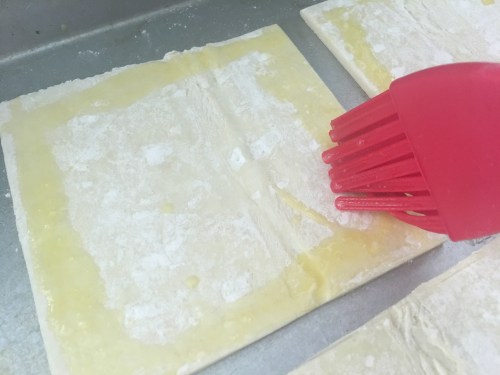
Then brush the edges with egg wash,

fullsizeoutput_1b68.

.

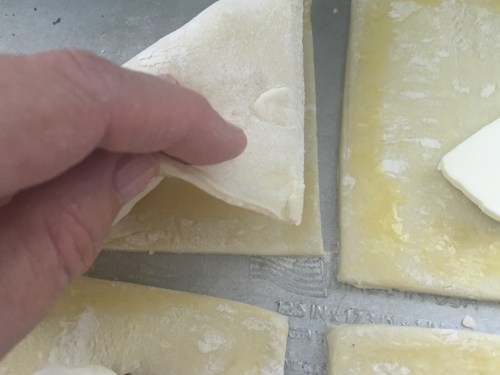
And lay a slice of guava and a slice of cream cheese like so…

fullsizeoutput_1b69.

.

Fold dough over so that you form a triangle, using your fingers to “seal” the edges.

fullsizeoutput_1b6c.

.

Lay the triangles on a baking sheet and cut a slit on top with a sharp knife,
being careful not to cut all the way through to the bottom layer.

IMG_8228.

.

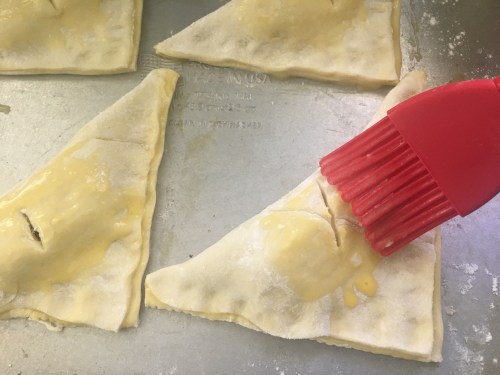
Brush the tops with the beaten egg… be gentle, you want the dough to rise in those beautiful layers.

IMG_8229.

Repeat with the other Puff Pastry section included in the package.

.

Bake in a 400* oven for about 20-25 minutes.  Don’t go too far away.  Keep a close eye on these, especially towards the end of the baking time… they can burn very quickly.

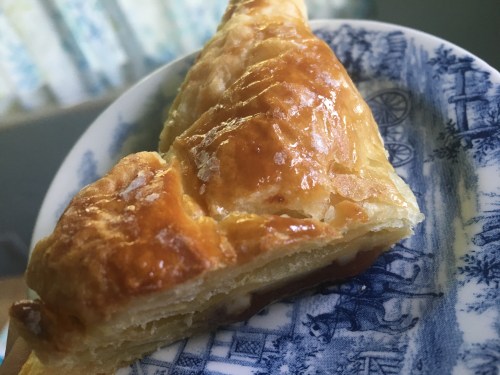
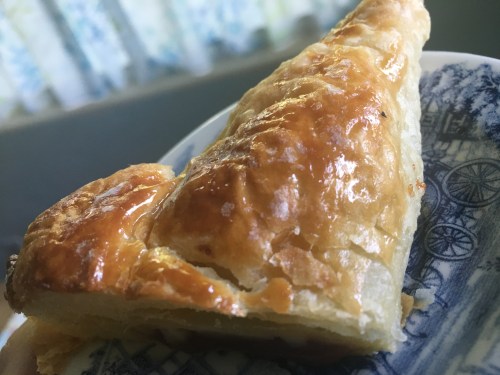
Once they are golden, take them out and after cooling for about 3 minutes, brush some of that simple syrup glaze over them.

fullsizeoutput_1b6b.

.

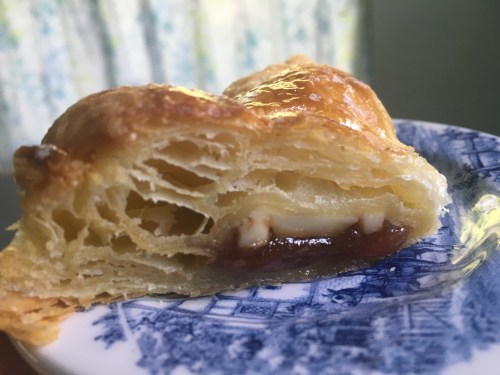
They are delicious when they’re warm!

.IMG_8249.

.IMG_8250.

.IMG_8251

.

.

See how easy that was?!!

I can’t wait to try making some more with different fillings that are traditional in cuban bakeries.  🙂

Enjoy!

Daisy

.

.

Recipe for Cuban Pastelitos de Guayaba (Guava Pastries

1 package of frozen Puff Pastry
1/2 cup water
1/2 cup sugar
1 bar Guava Paste
1 8 oz cream cheese
1 egg, beaten

1. Thaw dough according to package directions.

2. Make simple syrup by combining 1/2 cup of water with 1/2 cup of sugar in a small saucepan.  Stir until sugar is dissolved.  Bring to a boil.  Lower temperature and allow to simmer for about 5-7 minutes, stirring frequently.

3. Place one of the puff pastry sections on a floured surface and roll gently where the folds were so that the dough doesn’t break when you’re shaping it later.
Cut into four equal sections.

4.  Brush edges with beaten egg.  Place a slice of guava and a slice of cream cheese in the center of each square.  Fold over, matching corners in order to form a triangle, pinching edges with your fingers to seal them so that the filling won’t spill out.
Cut a slit on top, being careful not to go all the way to the bottom.
Brush with beaten egg.

5.  Place in a preheated 400* oven and bake for 20-25 minutes.  Keep your eyes on these so that they won’t burn towards the end of the baking time.
Cool for about 3 minutes, then brush each one gently with the simple syrup.

Enjoy them while they’re warm!


Salsa Verde

I got to spend last week at a Youth Camp with a bunch of friends from our days (years) in Texas.  It was wonderful to be with them again, and I was reminded how much I missed them.

Every night after all our work was done, one of the ladies would cook and make some “real food” (as opposed to camp food)…

Everything was great, but the homemade salsa was the best!  I realized it had been a long time since I had made any, and decided I better make some as soon as I got back home.

IMG_7948

.

Today I went to the local Farmers Market and bought a bunch of fresh ingredients to make several kinds of salsa.  The first one I made was Salsa Verde.

.

IMG_7947

.

To make salsa verde, (literally means “green sauce”), you need tomatillos, which come wrapped in a soft almost fabric-like covering.

Remove these husks from the tomatillos…

.

IMG_7949

.

After removing the husks, wash the tomatillos thoroughly (I actually use a sponge with soap & water).  Some have dirt and other residue, and you want to be sure and get all that off.

.

IMG_7950

.

Rinse well and drain.

.

IMG_7951

.

I like to dry mine with a clean kitchen towel before I roast them.

.

IMG_7952

.

There’s several ways to make salsa verde.  You can either roast the ingredients or boil them.  I like to roast them because I think it adds more flavor.

Place about 2 lbs of tomatillos on a roasting pan.  I use a 12 inch pizza pan and put it in my toaster oven.  I find that it does the job quickly and easily.

Add about half a medium onion, two cloves of garlic with skin on, and 1-3 Serrano peppers.  How many peppers you add depend on how hot you like the salsa.  I added two but found they were too hot, so next time I only added one and it was perfect.

.

IMG_7953

.

Put under the broiler for about 10-12 minutes, until everything looks charred and a bit mushy.

.

IMG_7954

.

Place all the roasted veggies in the blender, along with about 1/4 cup of cilantro (more if you really love cilantro, less if you don’t care too much for it).  Add 1/2 tsp of salt, and a pinch of sugar.

Blend until desired consistency.  Some like it more chunky, but I like it well-mixed for a smooth consistency.

.

IMG_7956

.

It makes a great topping for grilled fish, tacos, fish tacos,
enchiladas, breakfast tacos, just about any dish.

.

IMG_7957

.

Give it a try,

I know you’ll love it!

Happy Cooking!

Daisy

.

Recipe for Salsa Verde

1-2 lbs tomatillos, husks removed,
1/2 onion
2 cloves garlic (skin on)
1-2 serrano peppers
1/4 cup cilantro
1/2 tsp salt
Pinch of sugar

Place first four ingredients in a roasting pan and broil for 10-12 minutes, until tomatillos are charred.

Place roasted veggies in blender.  Add cilantro, salt, and sugar.  Blend until desired consistency.

Serve along your favorite tacos or main dish.

Enjoy!

.

.


Last week I knew I was going to see some long-time friends that I hadn’t seen in many years. I wanted to bring them something special that they would really appreciate. So, I asked my daughter if she would make some of her hand-lettering art pieces for me to give to them.

.

IMG_7874

.

She used watercolor background on some,
and a little touch of gold shimmer on each of them…

.

IMG_7872

.

I asked my friends beforehand what their favorite Scripture was
and also what color they liked…

.

fullsizeoutput_1a15

.

.

IMG_7875

.

She did such a beautiful job on each one, didn’t she?!
I found a special frame for each one and that made them even more beautiful.

If you could’ve seen their faces when they unwrapped them!  One of my friends, who recently lost every thing she owned in the Texas floods, had tears in her eyes.  She couldn’t speak for a few minutes, and just held the frame close against her.

My daughter wasn’t sure if her hand lettering pieces were good enough… I assured her they were. If you’d like to see more of her work, you can visit her on Instagram, at @analuisadesigns

.
Have a blessed weekend!

Daisy

.

.

.

.

Free Sewing Class!

I wanted to let you know, for those of you that have asked,
my class on Skillshare is free until June 30th!

Learn to Sew In 3 Easy Seams!

If you’d like to check it out, click here and it’ll take you right to it!
.
.
It’s a quick class, only 17 minutes long, but you can only watch it for free until June 30th.

Project & Giveaway!

I’m also doing a giveaway along with the class.
For those who make the project (just a quick & easy pillow case) and post
a photo of it, you can win 2 yards of fabric!

.

I hope you’ll check it out!  I’d love to have you visit
and let me know how you like it!

.

Happy sewing!

Daisy

Skillshare Class

Guess what guys?!!  I have my first class on Skillshare!

Learn to Sew In 3 Easy Seams!

You can watch the intro video by just clicking here:

Intro Video

.

Here are some of the titles in the class…

Tools & SuppliesSewing Machine TipsHow to Choose Fabric for this ProjectPreparing the FabricProject & Giveaway!

.

Why Skillshare?  Well, I love to teach, and I love to sew… Skillshare offered an easy way for me to do both at the same time, so it was an offer I couldn’t refuse!  If you love crafts of all kinds – quilting, crochet, sewing, embroidery, cooking, baking, watercolor, painting, drawing, graphic design, anything you can think of… there’s a class for it on Skillshare!  I’ve been taking classes just for fun when I’m sitting for hours at airports, or traveling in the car for half a day.  It’s relaxing for me to do something fun like that.  So, I thought I could give teaching a class a try, and see how it goes.

I also like how every class on Skillshare is set up with short videos that are usually 2-5 minutes long, so if you don’t have a lot of time, you can just watch a segment or two at a time.  Also, entire classes are short, so that anyone can take them.  My class is less than 30 minutes long all together.
.

I hope you’ll give it a try!  If you’d like to find out how you can take this class or watch another video in my class, just click here:

Skillshare Class

.

Oh yes, I almost forgot!  I’m also doing a giveaway as part of the class –
Three winners will each receive two yards of fabric!!
.

It was fun to work on this class, and I can’t wait to do the next one!

Stay tuned!

Happy Sewing,

Daisy