Feeds:
Posts
Comments

Periwinkle Quilt

I’ve been working, on & off, on these little blocks…

.

I didn’t want to use just plain white for the background, which is what I’ve done so many times…

I wanted something more fun and out of the usual for me…

.

.

I love this shade of blue… makes me smile as I sew…

.

.

I used the template for mini periwinkle and the papers for wacky web pattern, both from Missouri Star Quilt Co.

.

.

I used the Arbor Blossom charm pack. So much fun to work with these bright and cheery fabrics!

.

.

I’m still not sure what I’m going to make with these blocks…

.

.

What do you think? Quilt? Placemats?

.

I thought of maybe making a picnic table quilt?

Should I use the red thread or the blue thread for the hand-quilting??

.

I’ll appreciate your input!

.

Have a blessed weekend!

Daisy

Advertisement

A New Computer

I GOT A NEW COMPUTER!!!!!!

If you have been following me for a while, you know that I spilled tea all over my brand new computer two years ago, and have since been without one…

But my husband surprised me yesterday with a new computer for my birthday!  And it’s not just any little old computer… he got me a beautiful, desk top Mac.
I know!!!  I couldn’t believe it!  I STILL can’t believe it!
It’s so much fun to work with!

I don’t know how I’ll be able to get anything done around the house in the next several days & weeks!  haha

I’ll finally be able to keep up with the blogging world (including my own little blog), and I’m excited about publishing the Skillshare class I’ve been working on, as well as other things I’ve been looking forward to for a while but had to put on hold until I had a computer.

Anyways… I know this is not an exciting post with a new project or recipe… but I was so excited I just had to share.

Have a wonderful week!

Daisy


1118C783-7D6D-48C3-946F-8639632E8DC1

.

I love to sew for my grandkids.  I don’t have a lot of time, but I do a little every chance I get, especially early in the mornings or later at night.   It’s so much fun for me, that it’s actually a de-stresser 😊

.

I made this little grey dress for one of my granddaughters.

I used pattern Simplicity #5704, but I always end up making several changes; It’s more fun and makes it more personal as well.

I got the fabric with the tiny flowers at Joann’s, the trim and the button at Hobby Lobby, and the solid grey fabric for the lining at WalMart.

It’s not that I went shopping at three different places just for this one dress… these are places I regularly go to looking for sales, so these things were ones that I had set apart for “someday” (which is usually what I do) 😁

.

060C419E-8B4D-48A6-9FB7-B9D4CB7659F1

.

For the trim on the yoke front, I just used the same trim as the hem, but I placed them side-by-side, making it look like a wider trim, more in keeping with the size of the yoke.

A pretty button and some ribbon add a finishing touch to the top of the dress.

.

C584071A-EF0D-4509-BB15-18F3426D8BE0

.

I try to make the back of the dress as pretty as the front, so I decided to add some trim and I sewed on some tulle for a soft bow that ties after the dress is zipped up.

.

F1349805-8B83-45A0-A91B-8AAF2DF521CC

.

I really enjoy sewing, but especially when I’m sewing for my grandkids.  I smile almost the entire time.  I hope they enjoy wearing the little clothes, or playing with the little sewn toys, as much as I enjoy making it for them. 😊❤️

.

.

Happy sewing!

.

Daisy


51540F3B-ECE7-47A0-8D90-9BF5C2ED53F2

I’ve been away a lot lately and I’ve also had computer problems, so those two things have kept me from updating my blog.  I’m hoping to fix the computer problem this week (but I’ve thought that before and nothing happened!) 😁

I’ve been posting a lot on Instagram because it’s so easy to do from my phone and I can send it from anywhere.  So I’m going to try to post as often as I do on my IG account.

.

.

52F75BB6-EA4A-4BEE-8A0A-DD2C6C95F751

I am working on this Ocean Waves Quilt, which is one of those Christmas gifts that I’m working on throughout the year.  I’m wondering what kind of border to put on it… I’ve got a few options I’m thinking about,  but I really want to finish it by the end of next week and then begin the hand-quilting.

So, if you have any suggestions or ideas, I’d really appreciate it! 😊

Happy weekend!

Daisy

Ocean Waves Quilt

This year I am hoping to finish a few UFOs that I have in my sewing room…

And this one is at the top of the list…

659F072A-8010-4A5C-A816-A417B84B6495

.

CFC52B19-D5CA-4209-9CCD-93F0CB2C4A3C

.

.

B95A92D7-EB09-48C1-9D3A-BCE024148F54.

I started it about two years ago (I know!) but other projects became more “urgent” and I had to put it away for a while.

It’ll be a Christmas gift later this year, but I’m trying to work on gifts throughout the year, so that I won’t be stressing later, wishing I had started earlier… (anybody know what I’m talking about??)

.

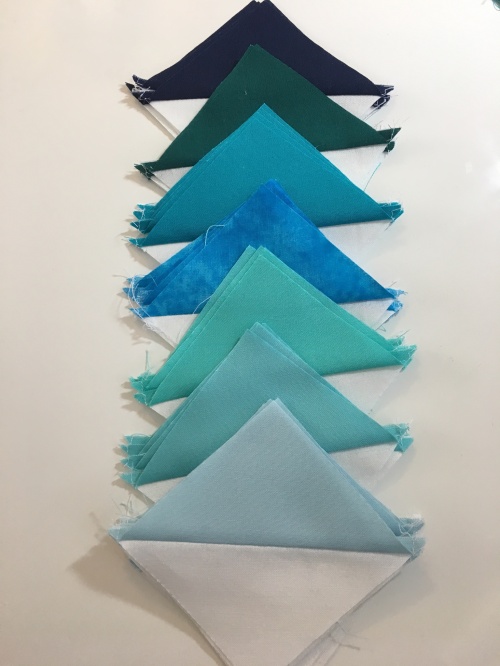
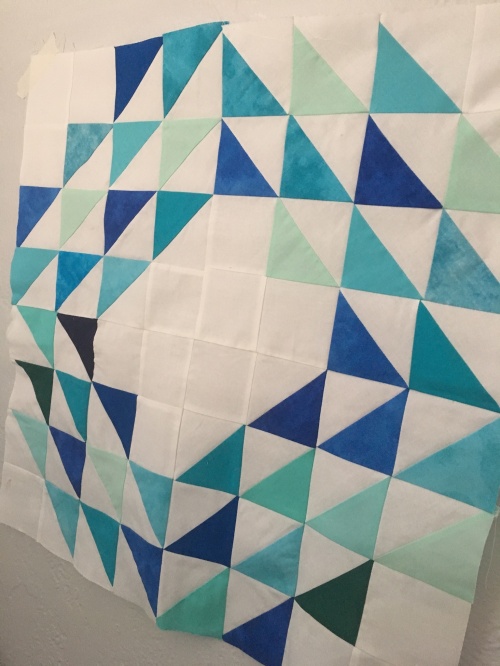
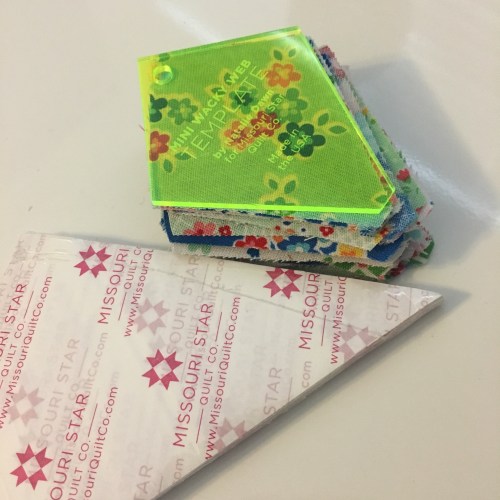
I started out by gathering different blues & greens, 100% cotton, and cutting them into 5” strips, then 5” squares…  (NOTE:  This is Waverly fabric that I buy at Walmart.  It’s beautiful, 100% cotton, and great for quilting!  Also, it’s a lot more affordable!)

B47CC690-E046-4DBE-A068-9BF7715ACFBE

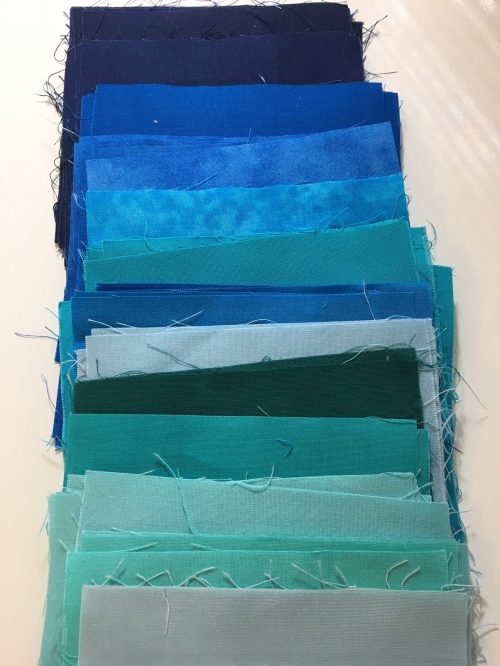
. (They have all those strings on the edges because I cut them two years ago and they’ve been sitting in a plastic bag, waiting for me to pay attention to them!)

.

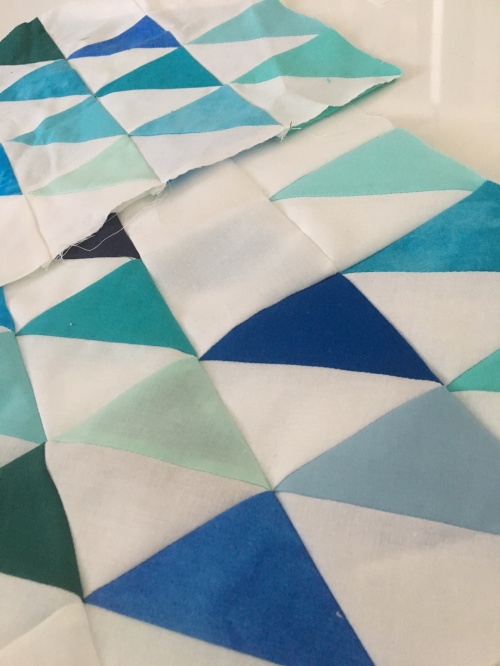
Then I sewed them into half-square triangles using a white cotton, and ironed them with seams to the darker side.

I make half-square triangles by placing two 5” squares, right sides together, and sewing all the way around the square (with a quarter-inch seam).  Then I iron it, and cut across in an X (corner to corner).  You’ll have four half-square triangles.

Don’t they look pretty, all neatly grouped together?… I love ocean colors… sigh…

EAD3B9AE-34E0-4C29-938C-63FCEDF183CF

.

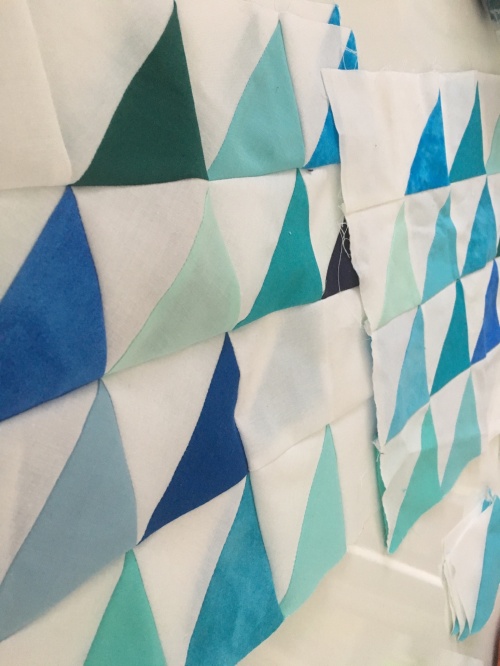
Then it was time to trim those little “ears”… It really helps when you’re sewing them together!

See how nice they look once they’ve been trimmed?

.

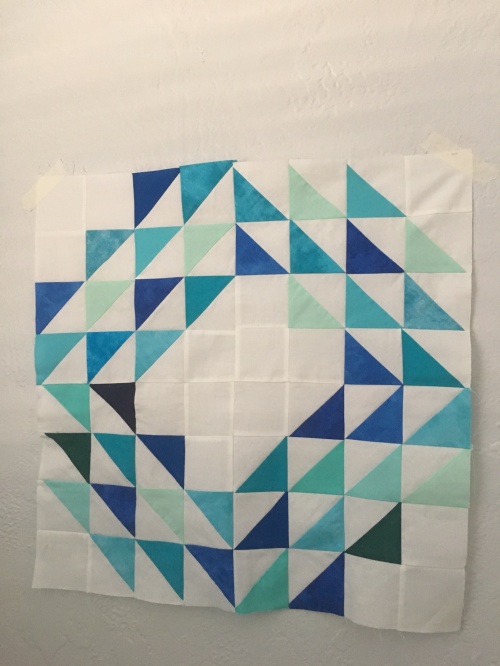
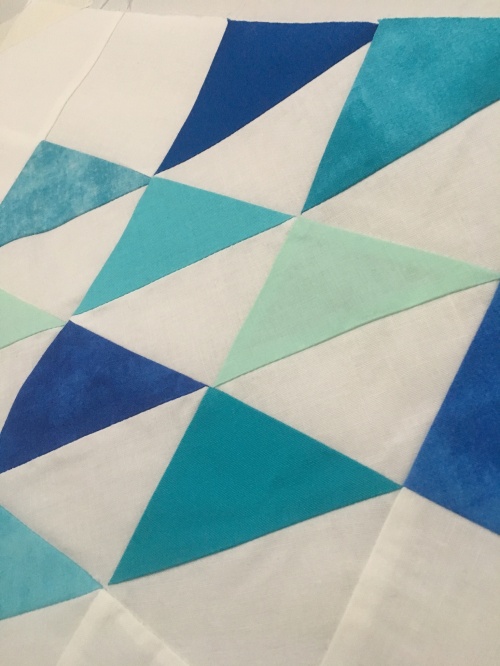
Once all the half-square triangles have been sewn and ears trimmed, then it’s time to lay out the square, paying close attention to the pattern — It’s easy to get confused, but after you’ve done it about 20 times, it gets easier. . .

B89591ED-20A2-43EE-8CD8-F9C92EE03733.

I love all the blues & greens…

Colors from the sea.

(Have I already said that?)

.

EB2C2BDD-FBDC-46AA-ADAB-B7AE62967AEA.

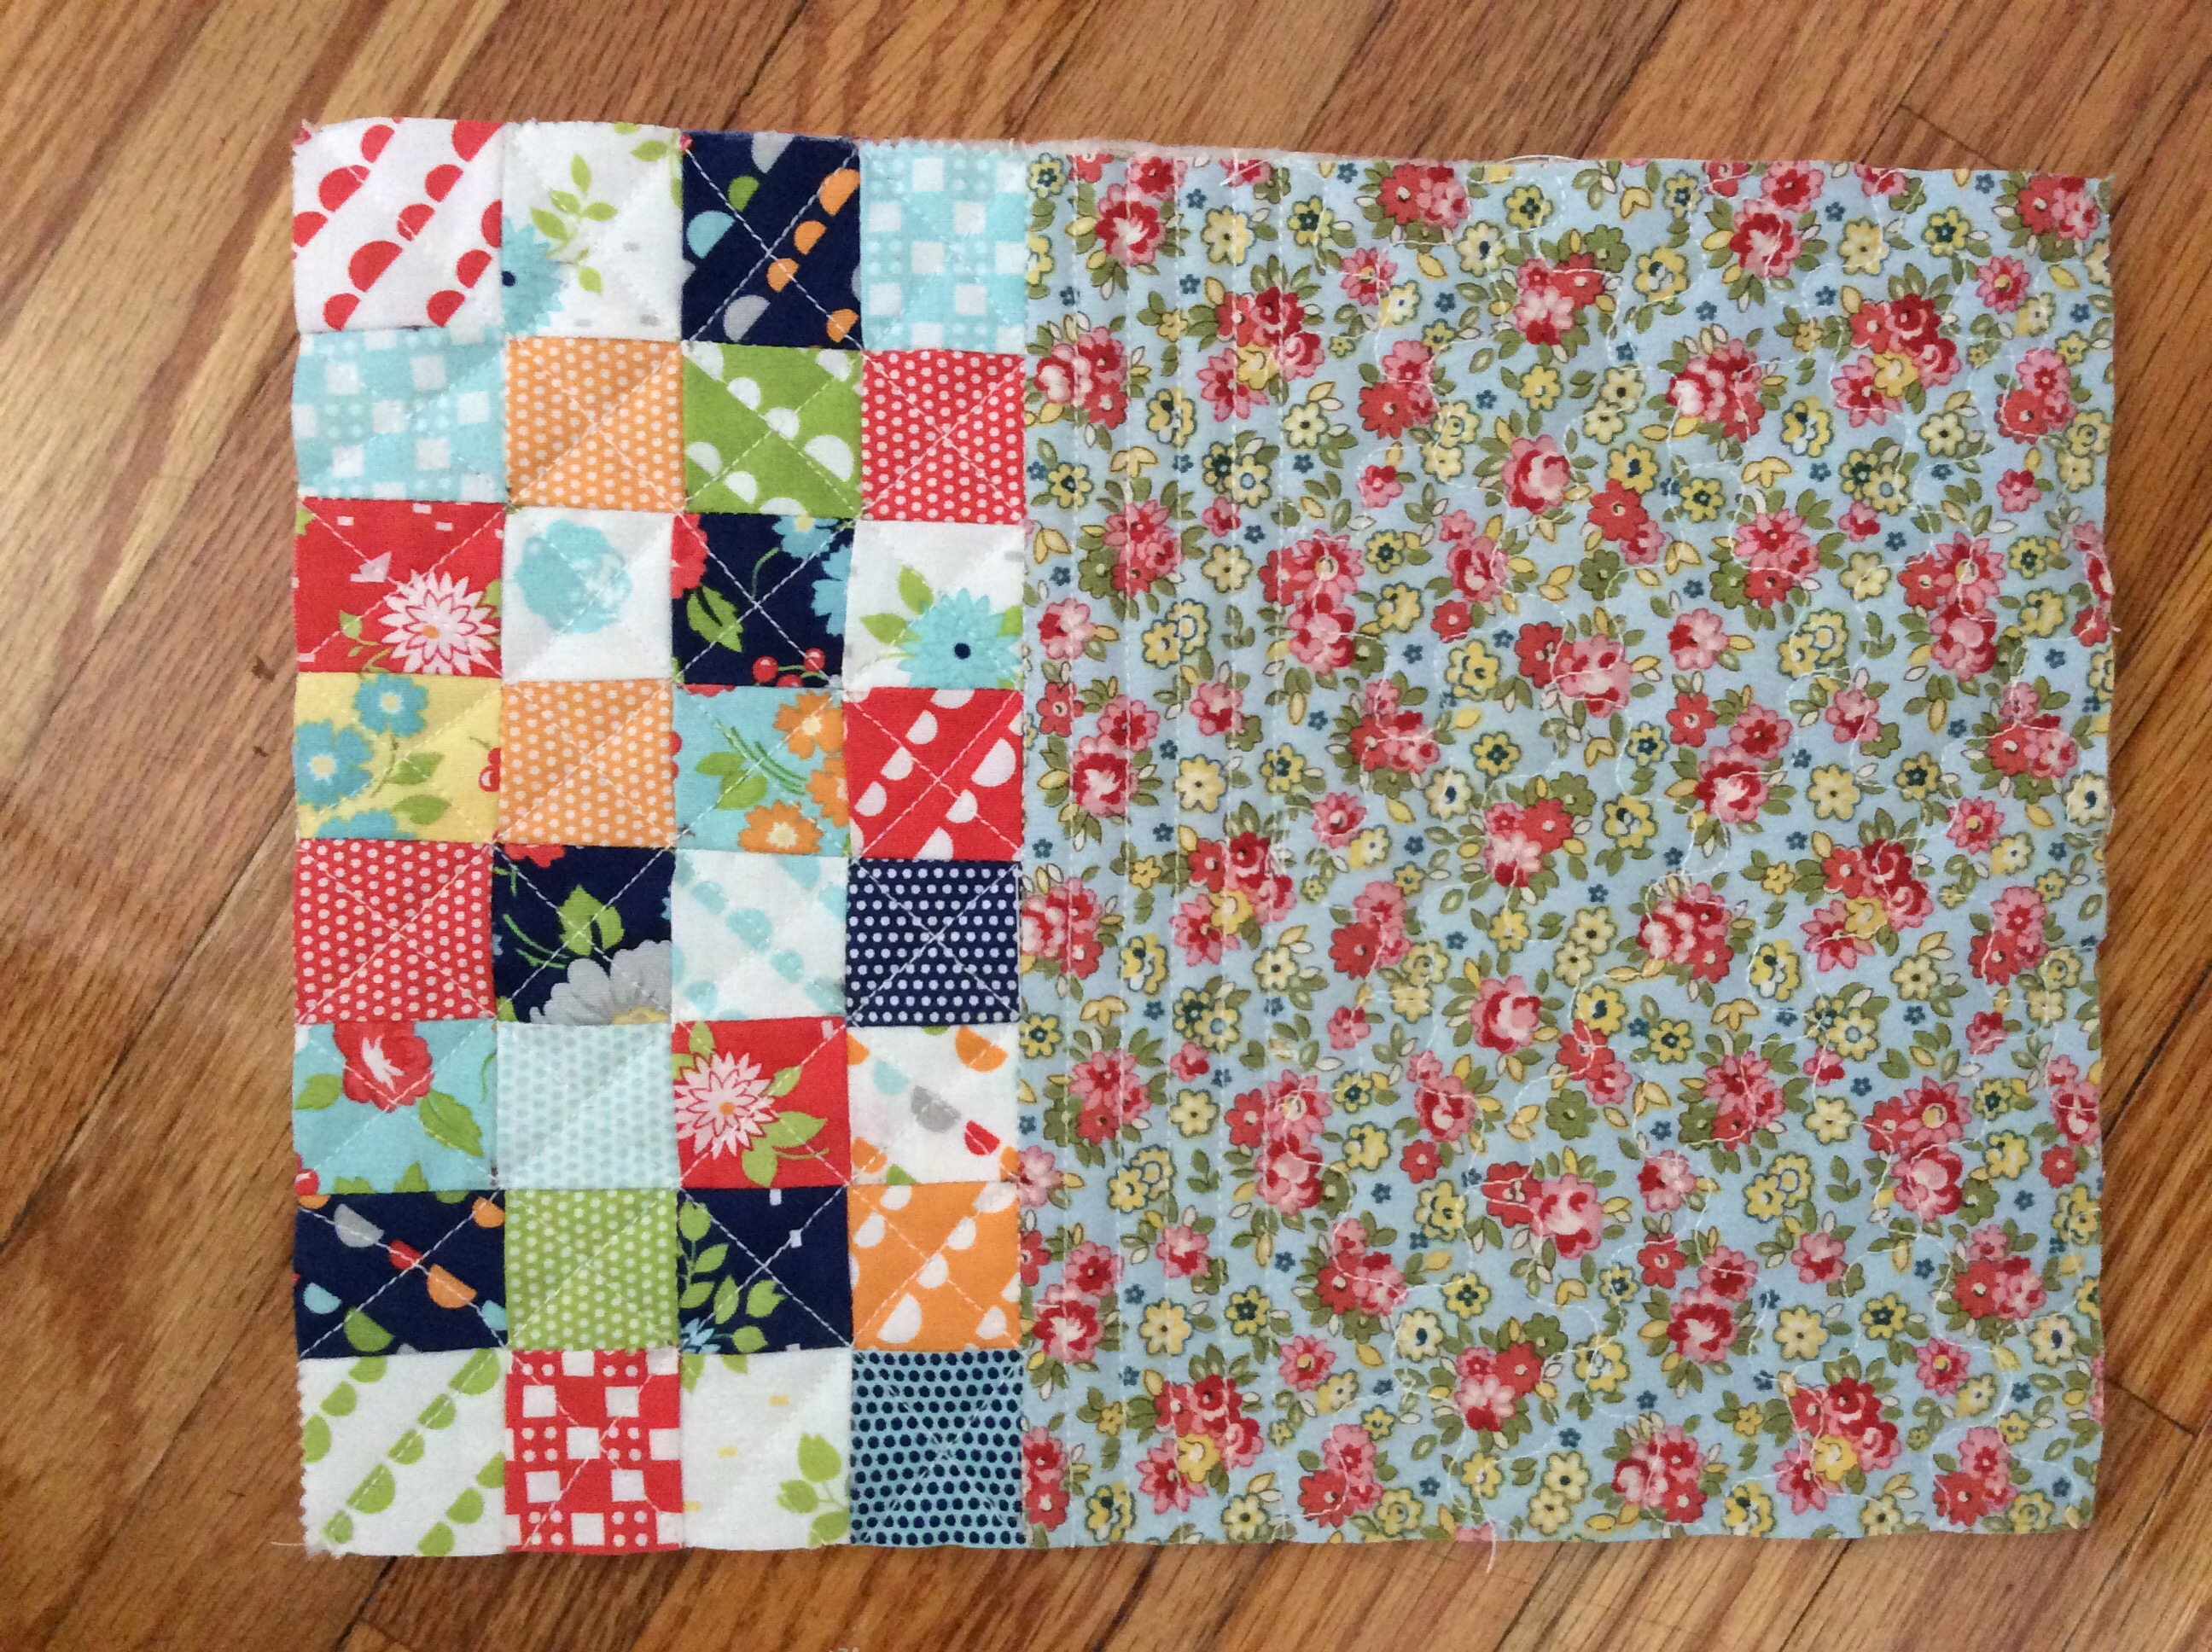
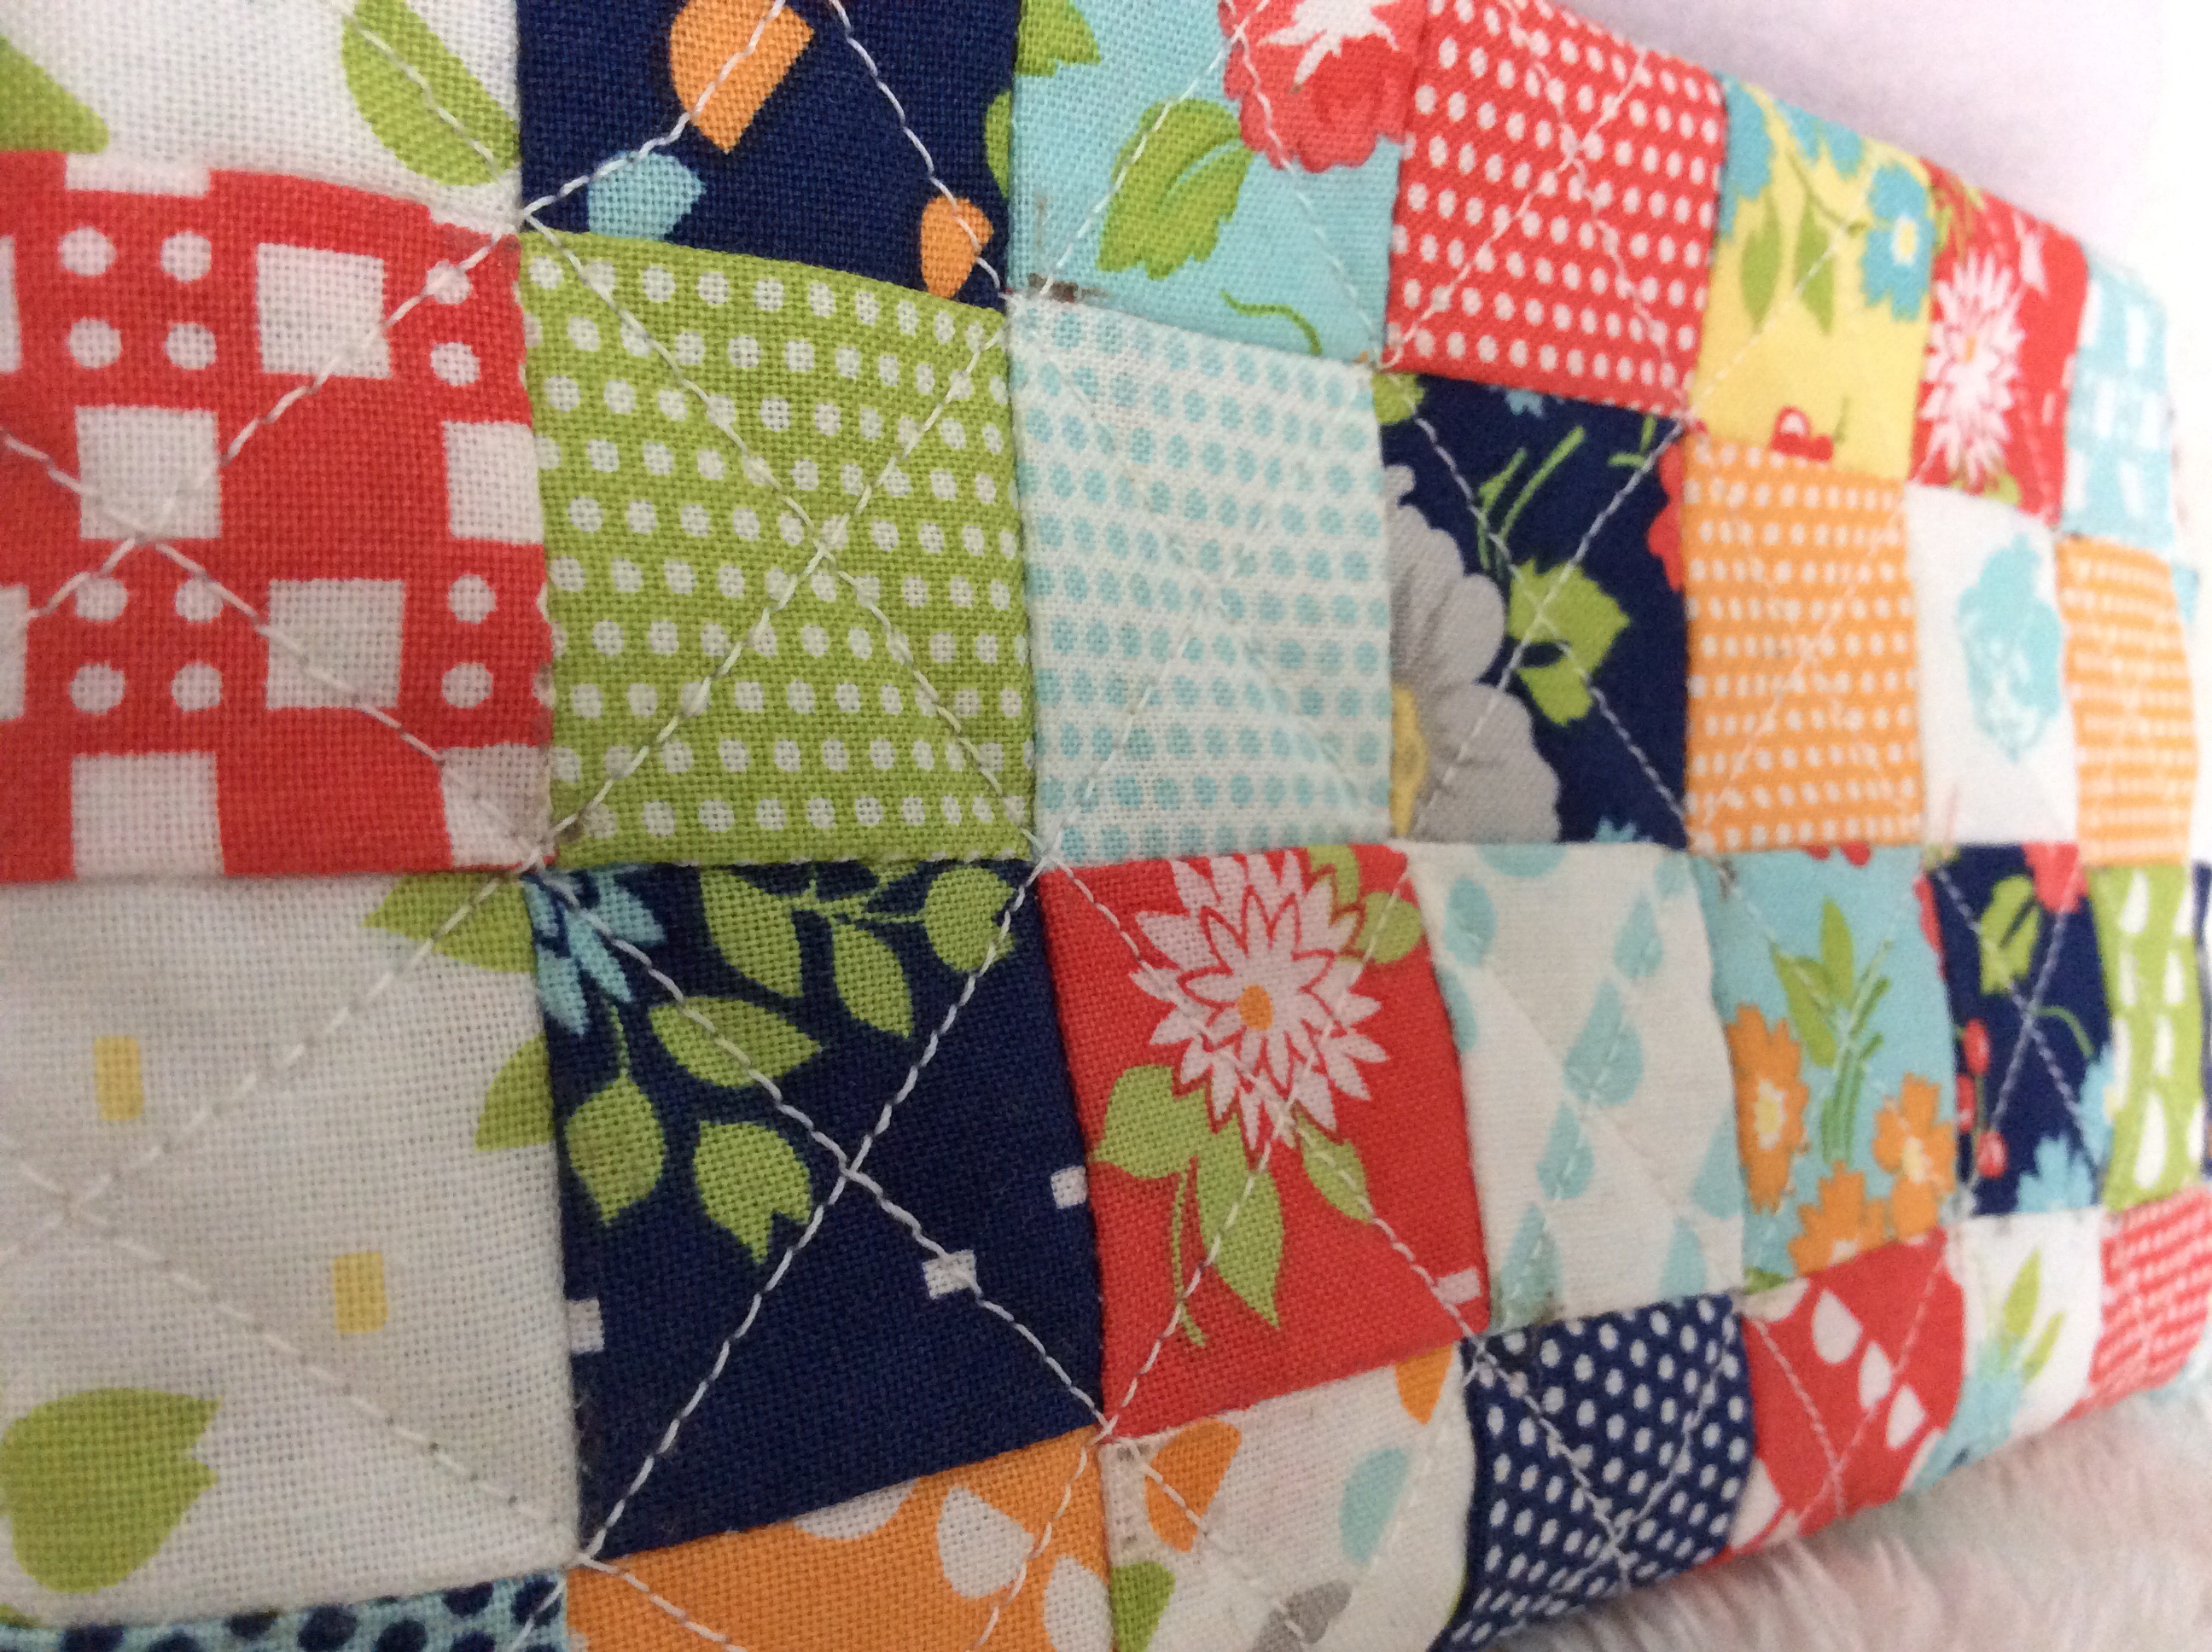
It’s a simple pattern, great for a beginner, because it looks very complicated but it’s actually just half-square triangles making up one block that is used over & over again.

.

27EC54EC-3525-4484-90DD-036C9514A858

.

Once you have four of the same squares, you put them together (again, paying close attention to the pattern), and sew them so that they make up one big square.

For the quilt I’m making, I need 16 of these “big” squares.  It’ll be perfect for a Queen-size bed, but OK also for a King, if it has another sheet or blanket layered beneath it.

.

I chose these colors because the family I want to give it to, they love ocean colors, too!  (Who doesn’t?!)

.

960D52CF-8E24-4D08-AD26-0183E7A76901

.

Half-square triangles are so versatile for quilt patterns… the possibilities are endless!

.

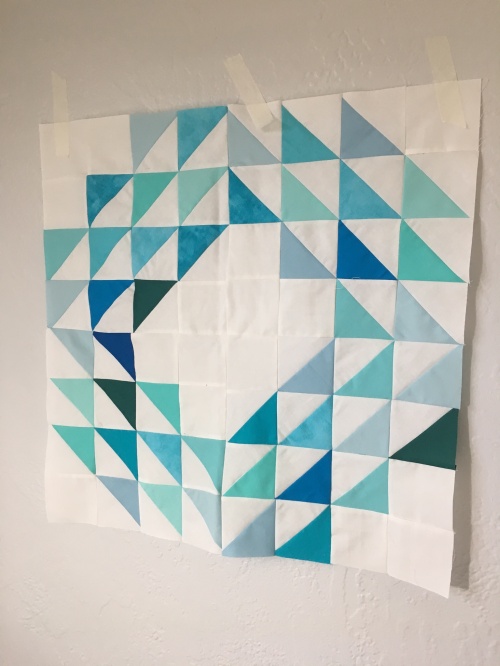
This is what it looks like when 4 squares have been sewn together to make up the “big” square.  You can tell that it’s the same square, just turned a little differently each time.  (It took me a while to realize this!)

I tape one onto my wall so that I can look at it while I sew and keep those squares in the right place.

CFC52B19-D5CA-4209-9CCD-93F0CB2C4A3C

.

I’m hoping to finish the quilt top this week and then begin the hand-quilting.

Anybody have any suggestions on the hand-quilting?  I’d love any ideas!  I may just do straight lines across the squares, but I’m thinking that something circular, to mimic waves, might be fun.  Let me know what you think.  I’d appreciate any ideas you may have! 😊

Happy sewing & quilting,

Daisy


Two Years Ago

62FF9962-29E8-4E66-8C1B-2B44475C3C02.

Homemade veggie pizza has now become a staple in our house.  I make it with a whole-wheat crust and pile on lots of veggies.  It really is delicious.  I’ll share that recipe with you at the end of this post.  I hope you’ll try it – I know you’ll love it!

Two years ago, this month, I began an adventure in a radically different (for me) health plan. I had a “routine” Dr visit which turned into a wake-up call for me. I knew I had to do something drastic if I wanted to feel better and avoid what could be terrible health issues. With the Lord’s help and guidance, this month marks two years that I have been on this health plan. I still have a lot to learn and there are days when I have to talk myself out of having a nice big slice of chocolate cake…  But overall, it’s been amazing.

I literally feel like a different person!  My cholesterol is down, my sugar level is great, my good cholesterol is up, my blood pressure is much lower, I lost 25 lbs., I have so much more energy,  …and the diagnosis I got at the Dr that day is no longer the same!!   Another huge factor is that I haven’t had a migraine for two years!!!!!!  If you knew me, you’d know that is amazing!  That fact alone, was well worth the change in diet.  I just thank the Lord every day for His strength and joy throughout this process, and look forward to continuing in this journey.

I’m not going to write 10 posts about it, tell you what you should & shouldn’t eat… We all know what is healthy and what is not.  I just had to share because I’m so thankful.  I wish I had started eating this way decades ago.  What a difference it would’ve made.  But, I’m happy to have started and looking forward to growing in this process through the rest of my life.

Take good care of yourself, friends.  The saying “you are what you eat” is really true!

And now, here’s that recipe I promised:

Pizza Crust
1 cup whole wheat flour
1 cup bread flour
1/2 tsp salt
1 cup water
1 pkg. yeast
1 Tb sugar or honey
2 Tb olive oil

In a small bowl, warm the water so that it’s warm when you dip your finger but doesn’t feel too hot.  Add 1 packet of yeast, and sugar; Stir until dissolved and set aside for five minutes.
Meanwhile, in a large bowl, mix the flours, and salt.  Add yeast & water mixture, Add olive oil, and stir until well- blended.  Add more flour if mixture is too sticky.  Knead for 8-10 minutes.  Place dough in a clean, oiled large bowl, cover with clean kitchen towel, and let rise for at least an hour.

Punch down dough gently, and place on floured surface.  I usually cut dough in half to make two 12” pizzas, but you can either use it for personal pizzas (6-8”), or one large pizza (18”).

Building your perfect pizza:
Now you can have some fun with toppings!  I usually brush the shaped pizza dough with olive oil, sprinkle garlic powder, and add fresh ingredients:  basil, artichoke hearts (my favorite!), yellow zucchini, green zucchini, mushrooms, onions, sweet peppers, and anything else you want!  I buy fresh mozzarella, and place some slices over the top.  You can also sprinkle some oregano, and drizzle a little olive oil over the top.

Bake it in a hot oven, 450-500*, for 30-40 minutes.  The crust will be crunchy and the veggies will be cooked and delicious!

Enjoy!

Happy healthy eating,

Daisy


Now that presents have been opened, I can share this cute little quiet book I made for my granddaughters.

Handmade gifts take more time, but as the years go by, they are usually the ones that outlast the others, especially if we take care of them.

97B67C79-0506-4930-AC64-E836C32D8CBF

.

It was a lot of fun, although much more time-consuming than I had expected (isn’t that true of almost all craft projects?!?)

I made two of these Quiet Books – one for each of my granddaughters.

I bought these fabrics years ago – before I ever had granddaughters!  I knew those cute little dolls & accessories were going to be the base of some great project in the future (You say that to yourself, too, when you buy fabric?).

1FAAF4F7-EED2-44D6-904F-70EDC8DFBEFF11C37B7F-A653-4B03-A14C-0B0F48ADA241

.

I used this stabilizer because it’s light, but it also gives a little more “stability” to the fabric.  It also adds an adhesive to the back, which I thought would be useful when working with several layers.

DB73B0E8-6A54-4B7B-882A-394E6C7FBE21

.

Instead of cutting everything out first, I decided to iron-on the stabilizer onto the whole piece of fabric.  It makes cutting out those tiny pieces so much easier!  Then I rough-cut around the edges and peeled the paper from the back (don’t forget this step or else you won’t have fusible anything).  I placed them on light-weight batting and ironed them carefully, moving the iron very slowly.

B629D7E8-3B11-49D9-BC9A-9FFDA93C75E0

.

After doing this process with the first doll, I decided to cut out the shapes first and then iron them to the batting.  Either way works fine.

Pretty soon you’ll have a little stack, ready to be sewn down.

1AA3A83E-B39A-4F38-9AB0-B6B14F97E9E3BD8B06B3-D8BC-4666-97FA-F74A7B43E041C236A0F4-C3DB-4C05-AFB8-49BDE80480DA

.

I then sewed around the edge of each piece.  Tip: Go slowly!


13888627-B90D-4B44-A081-BF98E999585B

.

I wasn’t sure if the clothes would “stay” on the dolls, but they do!

4992DA6D-C93F-4BCF-BC99-5C2A77A258BEAA024EB4-CCBD-41A2-A497-F84620E7B1EE3E565DE9-26AE-47A7-92EC-D5D035895ADD

.

Isn’t that the cutest little kitty?!

I kept thinking of my granddaughters, praying for them, and smiling… thinking to myself, “They’re going to have so much fun playing with this little Quiet Book.”

.

24451289-D08D-4A29-9158-98A0027EE5671465F048-A9AB-4977-93A5-B16A27505A13

.

Then it was time to make the actual “book” where all these pieces would go.

I had chosen the fabrics before starting the project, so that was a time-saver.  I kept it very simple.  In each page I put a “pocket” to hold the clothes, while on the other side there was space for the doll.  This pocket has elastic to hold the tiny pieces in, and a little sparkle ribbon at the bottom.  On the other side, there’s a little rick-rack and lace to make it feel like a dressing room for the dolly.

6942776E-410A-4BD8-BC2A-85C4AF87848C

.

The elastic helps keep thinks inside.  (We’ll see how well that works when the girls start to play with all the pieces!) 🙂

1C1A71FB-968C-453F-8B14-9A06B04C1E06

.

The second “page” has a different dolly, with a set of clothes and accessories of her own.  I made this pocket look like a totebag or purse.  I’m hoping to teach the girls how to sew when they get older, so I thought it was appropriate to put a dress form and sewing machine on here.  :).

0F48FF47-764A-4DD6-96CD-D16B2777A522

.

The third and last page has a soft, flannel pocket, almost looks like a comfy bed, where the doll goes.  On the other side is a pocket with a flap, holding all her dresses and other cute items for her.

BD7A6BDD-107A-430F-BDDE-0E7F7F61543A

.

I sewed on a little tassel to add some sparkle and a touch of pink.  The girls can use this to open up the flap.

9C790AA6-B284-46FF-B77E-36363C37D8DD

.

I have to tell ya, at any age, it’s fun putting outfits together with these sweeties.

77124A2B-F6FA-4CBE-9E91-FB014D63CCCE.

.

Here’s the outside.  Nice and simple.  Not too complicated.

A2CD07D6-9EF1-42B3-B8CB-1F0A089E6C7F

.

.

E387AF40-BD9A-4130-B86E-BB54840B9BFF

.

I hope you got some ideas of your own and you’re off to sew something amazing!  Have fun and Happy Sewing!  Also…

Happy New Year, everyone!

Daisy


72F6AAB6-EC88-4A00-9414-79C60522CD3A

Thank you all so much for the way you responded to my last post.  It’s funny (not in a humorous way, but a thought-provoking way) how through this “blog world” I have made some unexpected friendships that have been a real blessing to me.

I really didn’t expect a lot of response after not posting anything for six months!  But you guys have just made me feel as if I got a hug from each of you!  You didn’t have to do that, so it means all the more.

I’m so looking forward to reading through your blogs and catching up on all you’ve been doing, and what’s been going on in your lives.

………………………………………………….

Now, about edible gifts…

We have several Christmas get-together with Pastors & their wives (with whom we work) in different regions so it gives me a chance to bake some special little things that are really only around at Christmas time.  (Not sure why!  They are good enough to eat all year round! 😊)

E9E3442F-7C9C-4764-94BA-2C7B3E0679C2<<<
s year I made three different things to go in the gift bags.  Mini Oreos, dipped in white chocolate and rolled in crushed peppermint candies.. Mini Swirl Cinnamon Bread loaves… and Fudge Brownies.

The mini Oreos are so easy. You just dip them in melted white chocolate then roll them in crushed peppermint candies. Place on a wax papered-covered baking sheet, and place in refrigerator (This will keep them crunchy). I was surprised how long they stayed fresh! They are a delicious treat!

<<<
n came these mini Cinnamon Swirl loaves. Just use your favorite recipe, and you can add raisins, dates, or dried apricots – whatever you prefer.

The key is to bake them in paper loaves so you can just wrap them up in cellophane after they've baked and cool.

<<<
last but certainly not least, are the fudge-y brownies, made with dark chocolate chips, if you like that extra chocolatey goodness. These are my favorite!!

<<<
s always fun to bake something a little extra special for people that you know could use an encouraging word, letting them them know that they are appreciated, their work is not in vain, and that they're loved.

What are you baking today? Are you baking something sweet for someone special?

Have a wonderful Christmas season!

Hugs,

Daisy

Update

Hi friends,

DD57BEA7-60DA-413F-8C27-421A86CC45CD

I’m not sure if there’s still anybody out there who will even stop to read this, but in case there is…

Earlier this year, my husband gave me a brand new MacBook.  It was to replace my almost 9-year old laptop, which I had worn out.  I was thrilled with it and looked forward to all the fun I was going to have using it not only for work and ministry, but for a creative outlet as well.

On the third day of using this beautiful new laptop, I sat down to have my devotions (as I usually do in the morning), with my cup of Herbal tea, and as I reached for something on the table, I tipped over the mug of hot tea and it spilled all over the keyboard.  It literally looked like fireworks were going off on my laptop.  I tried everything but nothing worked.  Took it to the Apple Store but they told me that my $300 Apple Care plan would not cover any of it because it was considered water damage, and that is the one thing they don’t cover.  If I had dropped it on my driveway and run over it with my car (by accident, of course!), they would gladly replace it.  But not water damage.  The best picture I can find of how I felt at the moment:  😩

And that is the reason I have not been in the blogging world since June.  I’ve used the app many times before, but again, back in June, the WordPress app was glitching and several of my older posts were removed.  I knew it was a mistake because it was about quilting, nothing of international concern. LOL  I finally got it fixed this morning as I played around with the new settings on the updated app.

If there’s anyone who is still reading, …I humbly thank you!!  My plan/hope is to start catching up on all the blog posts I would’ve posted since June.  I still don’t have a laptop, but I’m getting used to using my husband’s iPad.  It’s not the same, but it’ll do for now.

Just to say thank you for reading through all this, I’d like to do a little giveaway.  I had a hard time choosing a charm pack from my stash because I like them all so much, but I finally chose one that I thought would appeal to most quilters and those of you who sew.

F7501679-44EB-4D6E-AE98-E0C4ABE9D25E522FC532-1AC7-4416-A99F-58DC0670B616

The charm pack is Hop, Skip and a Jump! By American Jane, Sandy Klop, for Moda.  It contains 42 squares of 5” fabrics, some patterns are duplicated.  I took just a few pics of several patterns but there’s many more in there.  It’s so cute!!

To enter the giveaway:  Leave a comment below about what your plans are for Christmas or New Years.   The giveaway is open until December 31st and I will be mailing the fabric to the winner first week of January.  For more entries, visit my Instagram by clicking on the icon on the right side of the screen or go to @adaisygarden  on Instagram.

Happy Friday, and have a blessed weekend everyone!

Daisy

Birthday Surprise

I love making things for my grand kids!  The tiny pieces and fabrics are so much fun to work with!

.


.

.

My daughter gave me this magazine about two years ago.  I’ve looked through it countless times, dreaming planning which projects I was going to make, with what fabric, and for whom.


.

You see the project pictured on the top right?  That’s the one I had picked out for one of my grand kids birthday.  I just thought it looked so cute!

If you’d like to get the pattern, you can find it by clicking here.  I love the website for this magazine!  It has so many ideas, patterns, and helpful tips!  The designer of this project is Jo Carter, and her website is http://www.twoowls.typepad.co.uk.  

.

The instructions are easy to understand and follow.  I must confess that as I pieced the bed, I wondered how this “rectangle” would become a bed, but as I went along, following the pattern, it all made sense and worked perfectly.

.

.

.

.

I love patchwork quilts, don’t you?

.


.

.

For the mice, I decided to use print instead of solid fabric.  


.

.

It was fun sewing on the tails and working on their faces.  As you can tell, I decided to use a fine-tip permanent marker (instead of embroidery) on the faces.  I was short on time… I had to get this in the mail in time for a birthday surprise!


.

.


.

If you’ve got any projects or magazine clippings filed under “someday”. . .  Choose one and get started!

It’ll be fun!

Happy sewing and a great weekend to you!

Daisy