Feeds:
Posts
Comments

Posts Tagged ‘Baking’

Creamy Cuban Flan

This is the BEST FLAN you’ll ever have!!
I don’t say that lightly… I’ve had a lot of flan in my life
(I’m cuban, so I guess you can say it goes with the territory! Haha)

IMG_9542

I’ve had a lot of flan in my lifetime!  Some are too watery, others lack flavor…

But this recipe is by far the best one I’ve ever tried.

It’s delicious, it’s full of that vanilla flavor, and it’s so creamy!!

.

IMG_9543

It’s easy – only 6 ingredients!  Just put the first five ingredients in the blender,
and pour into prepared caramel sugar.

And I’ve got a no-fail tip on how to do the caramel sugar so that you don’t get
any lumps.  It works every time!

.

My cousin shared this recipe with me over 30 yrs ago!
I wrote it down on a 3×5 card and I still use it!

.

IMG_9535

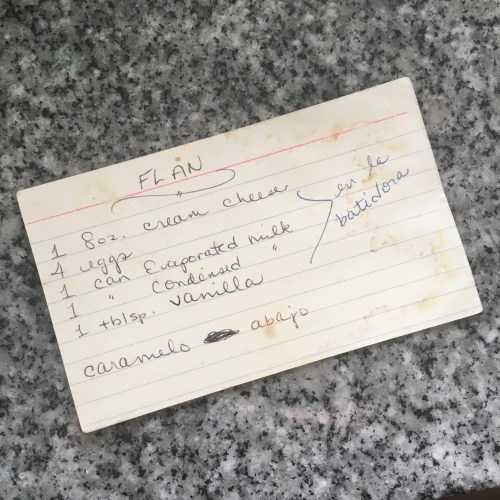
I wrote it in Spanglish because that’s how she dictated it to me!

.

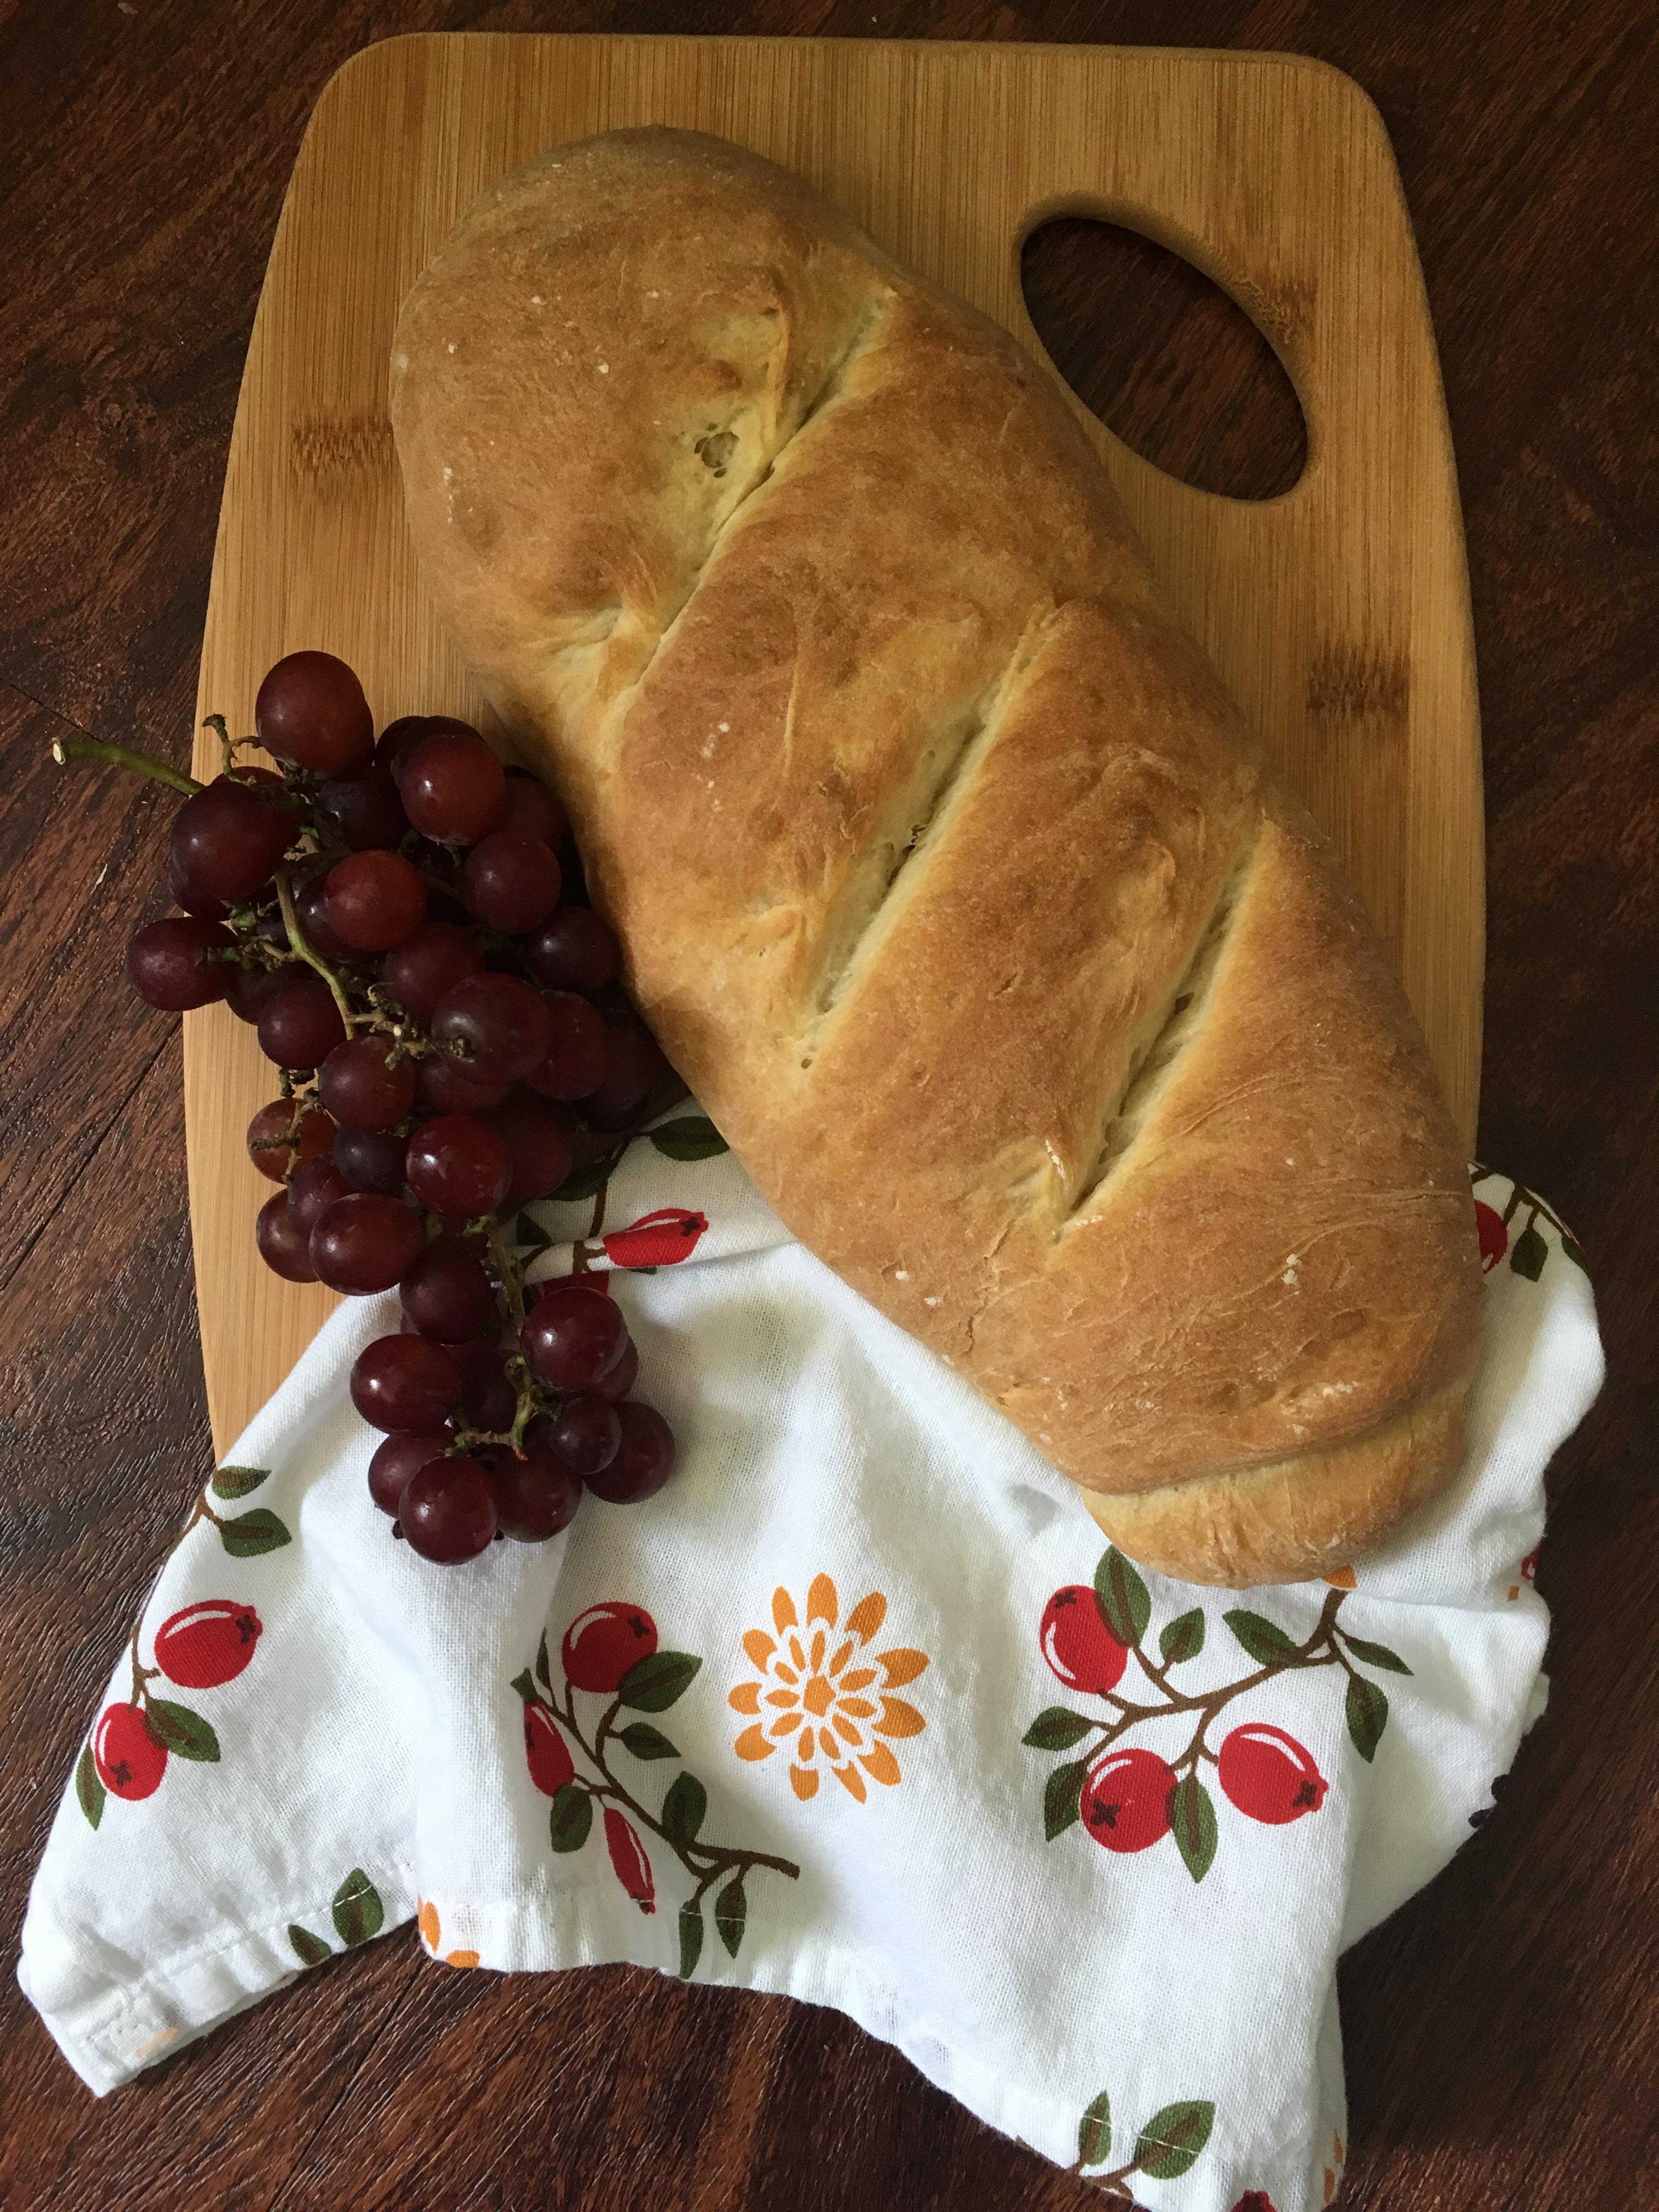
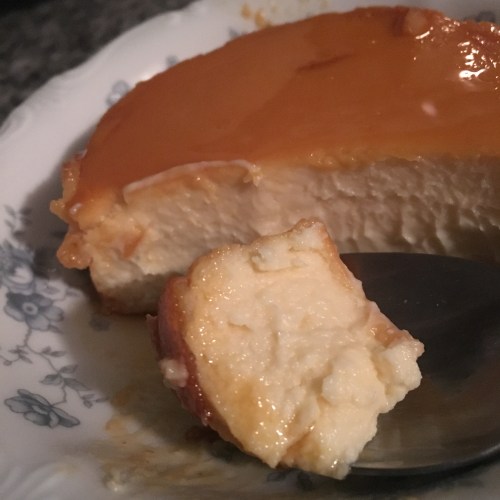
I made a big flan for my neighbors (in a cake pan), and placed it on a paper plate
to give to their kids for delivery.  They love it when I make food for them,
it’s so fun to see their expressions when they see me coming up the walkway!
.

IMG_9540

.

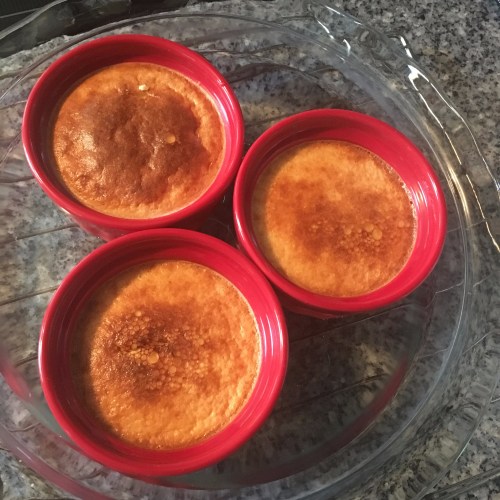
You can also make it in little oven-safe bowls.
.

IMG_9541

.

This is the creamiest flan you’ll ever taste!

.

IMG_9544

.

The little caramel floating around it and on top is the best part, of course!

.

IMG_9542

Here’s the recipe:

.

CUBAN FLAN

To make the caramel sugar:
Place 1 cup of granulated white sugar in a small heavy pot.
DO NOT add any water or anything else.
Place over medium-high heat.  Watch it closely, it will only take
a few minutes and can burn very quickly so do not walk away!
DO NOT stir until you begin to see a change in color at the bottom
of the sugar.  Once it begins to turn a darker yellowish color, then GENTLY
stir with a wooden spoon.  The sugar will very quickly begin to dissolve
and as soon as you see it turn a light brown, turn the heat off and stir
until completely dissolved.  Immediately pour into pan or bowls.
There is no need to butter or grease the pans.

FLAN  INGREDIENTS:
4 eggs
8 oz softened cream cheese
1 can sweetened condensed milk
1 can evaporated milk
1 tsp (or 2 if you like) vanilla extract

Place all ingredients in blender and blend until smooth.
Pour into pan with the caramel sugar.
Bake in a water bath at 350* for 45-50 min. if large pan,
30 min if small bowls.  You know it’s done by inserting
a toothpick (or small knife) in the center and if it’s clean,
it’s done.

Let it cool, but while it’s still warm run a knife all along the sides to loosen.
Carefully flip the flan unto a plate large enough to accommodate not just
the flan, but that wonderful caramel syrup that will overflow all around it.
Refrigerate a minimum of 3-4 hours.  I like to make mine the day before and
leave it in the fridge overnight.

NOTE:
Please Don’t be scared of baking with the water bath –
Just simply get a bigger pan, Place prepared pan with flan mixture
in the bigger pan.  I usually place this in the oven and THEN
very carefully pour hot water into the bigger pan and slide the
rack back into the oven.  Do not overfill the bigger pan with water –
just as long as it’s halfway up the sides of the flan, you’re fine.

…………………………………………
I sure hope you try this recipe because it’s a winner!

I’ve been making it for a long time and is a family favorite!

Let me know if you try it and how you like it!

Happy baking,

Daisy


Advertisement

Read Full Post »

I have been wondering for a while now, if it was possible to make cuban “pastelitos” at home as good as the ones in the bakeries I’ve been to in Miami…

If you’ve ever been to one of those bakeries, you know what I’m talking about.
There’s really nothing like it anywhere else.  I’ve tried them in many other cities,
but they’re just not the same… sigh…

I thought I’d try making some just for fun.  I had locked myself out of my house a couple weeks ago and the neighbors took me in, so I wanted to say thank you.  I was cooking a meal for them and thought these pastelitos would be the perfect dessert.

IMG_8250.
.

I’m so glad I did!  It was so much easier than I thought and they turned out pretty close to the famous Miami version.

You’ve got to try it!

.

IMG_8241

.

First thing you have to do is allow the Puff Pastry dough to thaw completely (but make sure it’s still cold).

Then make the simple syrup that will go on top by just boiling 1/2 cup of water with
1/2 cup of sugar then simmer for about 5-7 minutes.  Cool completely.

.

I bought some Guava paste (not the jelly or jam) and sliced it into about 1/4 inch slices.
I did the same with an 8 oz block of softened cream cheese.

fullsizeoutput_1b67

.

After the Puff Pastry thaws, cut each section into four equal parts.
(I had rolled a little bit where the folds were so that they wouldn’t come apart while cooking.)

fullsizeoutput_1b6a.

fullsizeoutput_1b70fullsizeoutput_1b6e

.

.

Then brush the edges with egg wash,

fullsizeoutput_1b68.

.

And lay a slice of guava and a slice of cream cheese like so…

fullsizeoutput_1b69.

.

Fold dough over so that you form a triangle, using your fingers to “seal” the edges.

fullsizeoutput_1b6c.

.

Lay the triangles on a baking sheet and cut a slit on top with a sharp knife,
being careful not to cut all the way through to the bottom layer.

IMG_8228.

.

Brush the tops with the beaten egg… be gentle, you want the dough to rise in those beautiful layers.

IMG_8229.

Repeat with the other Puff Pastry section included in the package.

.

Bake in a 400* oven for about 20-25 minutes.  Don’t go too far away.  Keep a close eye on these, especially towards the end of the baking time… they can burn very quickly.

Once they are golden, take them out and after cooling for about 3 minutes, brush some of that simple syrup glaze over them.

fullsizeoutput_1b6b.

.

They are delicious when they’re warm!

.IMG_8249.

.IMG_8250.

.IMG_8251

.

.

See how easy that was?!!

I can’t wait to try making some more with different fillings that are traditional in cuban bakeries.  🙂

Enjoy!

Daisy

.

.

Recipe for Cuban Pastelitos de Guayaba (Guava Pastries

1 package of frozen Puff Pastry
1/2 cup water
1/2 cup sugar
1 bar Guava Paste
1 8 oz cream cheese
1 egg, beaten

1. Thaw dough according to package directions.

2. Make simple syrup by combining 1/2 cup of water with 1/2 cup of sugar in a small saucepan.  Stir until sugar is dissolved.  Bring to a boil.  Lower temperature and allow to simmer for about 5-7 minutes, stirring frequently.

3. Place one of the puff pastry sections on a floured surface and roll gently where the folds were so that the dough doesn’t break when you’re shaping it later.
Cut into four equal sections.

4.  Brush edges with beaten egg.  Place a slice of guava and a slice of cream cheese in the center of each square.  Fold over, matching corners in order to form a triangle, pinching edges with your fingers to seal them so that the filling won’t spill out.
Cut a slit on top, being careful not to go all the way to the bottom.
Brush with beaten egg.

5.  Place in a preheated 400* oven and bake for 20-25 minutes.  Keep your eyes on these so that they won’t burn towards the end of the baking time.
Cool for about 3 minutes, then brush each one gently with the simple syrup.

Enjoy them while they’re warm!


Read Full Post »

62FF9962-29E8-4E66-8C1B-2B44475C3C02.

Homemade veggie pizza has now become a staple in our house.  I make it with a whole-wheat crust and pile on lots of veggies.  It really is delicious.  I’ll share that recipe with you at the end of this post.  I hope you’ll try it – I know you’ll love it!

Two years ago, this month, I began an adventure in a radically different (for me) health plan. I had a “routine” Dr visit which turned into a wake-up call for me. I knew I had to do something drastic if I wanted to feel better and avoid what could be terrible health issues. With the Lord’s help and guidance, this month marks two years that I have been on this health plan. I still have a lot to learn and there are days when I have to talk myself out of having a nice big slice of chocolate cake…  But overall, it’s been amazing.

I literally feel like a different person!  My cholesterol is down, my sugar level is great, my good cholesterol is up, my blood pressure is much lower, I lost 25 lbs., I have so much more energy,  …and the diagnosis I got at the Dr that day is no longer the same!!   Another huge factor is that I haven’t had a migraine for two years!!!!!!  If you knew me, you’d know that is amazing!  That fact alone, was well worth the change in diet.  I just thank the Lord every day for His strength and joy throughout this process, and look forward to continuing in this journey.

I’m not going to write 10 posts about it, tell you what you should & shouldn’t eat… We all know what is healthy and what is not.  I just had to share because I’m so thankful.  I wish I had started eating this way decades ago.  What a difference it would’ve made.  But, I’m happy to have started and looking forward to growing in this process through the rest of my life.

Take good care of yourself, friends.  The saying “you are what you eat” is really true!

And now, here’s that recipe I promised:

Pizza Crust
1 cup whole wheat flour
1 cup bread flour
1/2 tsp salt
1 cup water
1 pkg. yeast
1 Tb sugar or honey
2 Tb olive oil

In a small bowl, warm the water so that it’s warm when you dip your finger but doesn’t feel too hot.  Add 1 packet of yeast, and sugar; Stir until dissolved and set aside for five minutes.
Meanwhile, in a large bowl, mix the flours, and salt.  Add yeast & water mixture, Add olive oil, and stir until well- blended.  Add more flour if mixture is too sticky.  Knead for 8-10 minutes.  Place dough in a clean, oiled large bowl, cover with clean kitchen towel, and let rise for at least an hour.

Punch down dough gently, and place on floured surface.  I usually cut dough in half to make two 12” pizzas, but you can either use it for personal pizzas (6-8”), or one large pizza (18”).

Building your perfect pizza:
Now you can have some fun with toppings!  I usually brush the shaped pizza dough with olive oil, sprinkle garlic powder, and add fresh ingredients:  basil, artichoke hearts (my favorite!), yellow zucchini, green zucchini, mushrooms, onions, sweet peppers, and anything else you want!  I buy fresh mozzarella, and place some slices over the top.  You can also sprinkle some oregano, and drizzle a little olive oil over the top.

Bake it in a hot oven, 450-500*, for 30-40 minutes.  The crust will be crunchy and the veggies will be cooked and delicious!

Enjoy!

Happy healthy eating,

Daisy


Read Full Post »

72F6AAB6-EC88-4A00-9414-79C60522CD3A

Thank you all so much for the way you responded to my last post.  It’s funny (not in a humorous way, but a thought-provoking way) how through this “blog world” I have made some unexpected friendships that have been a real blessing to me.

I really didn’t expect a lot of response after not posting anything for six months!  But you guys have just made me feel as if I got a hug from each of you!  You didn’t have to do that, so it means all the more.

I’m so looking forward to reading through your blogs and catching up on all you’ve been doing, and what’s been going on in your lives.

………………………………………………….

Now, about edible gifts…

We have several Christmas get-together with Pastors & their wives (with whom we work) in different regions so it gives me a chance to bake some special little things that are really only around at Christmas time.  (Not sure why!  They are good enough to eat all year round! 😊)

E9E3442F-7C9C-4764-94BA-2C7B3E0679C2<<<
s year I made three different things to go in the gift bags.  Mini Oreos, dipped in white chocolate and rolled in crushed peppermint candies.. Mini Swirl Cinnamon Bread loaves… and Fudge Brownies.

The mini Oreos are so easy. You just dip them in melted white chocolate then roll them in crushed peppermint candies. Place on a wax papered-covered baking sheet, and place in refrigerator (This will keep them crunchy). I was surprised how long they stayed fresh! They are a delicious treat!

<<<
n came these mini Cinnamon Swirl loaves. Just use your favorite recipe, and you can add raisins, dates, or dried apricots – whatever you prefer.

The key is to bake them in paper loaves so you can just wrap them up in cellophane after they've baked and cool.

<<<
last but certainly not least, are the fudge-y brownies, made with dark chocolate chips, if you like that extra chocolatey goodness. These are my favorite!!

<<<
s always fun to bake something a little extra special for people that you know could use an encouraging word, letting them them know that they are appreciated, their work is not in vain, and that they're loved.

What are you baking today? Are you baking something sweet for someone special?

Have a wonderful Christmas season!

Hugs,

Daisy

Read Full Post »

Yes, I was skeptical, but it’s true!!

And only three ingredients!!  Can you believe it??!!

Lately, I’ve seen all kinds of recipes on Pinterest for different things that call for 3-4 ingredients… pancakes, muffins, truffles, cookies, …  After reading several dozen different takes on the cookies, I decided to add a few other things I need to have every day (according to my Dr.).

Here are the basics:

IMG_1958.

Yep!  All you need is 2 ripe bananas, one cup of quick oats, and your choice of 1/3 cup of raisins, dates, nuts, or chocolate chips.  You can also mix it up and have a little of each.

Today I used dark chocolate chips because that’s one of the things (believe it or not!) that I need to be eating!  I know, I know, it’s tough but. . .

To make these cookies fill the bill for my dietary needs, I also add flax seeds (either whole or ground, but I actually like the “toasty” flavor the whole seeds give).

.

IMG_1963

.

I realize I don’t need to show you how to mash ripe bananas, but I shared this photo because I just love the color of the blue with the pale yellow… (always looking at things as if through the lens of a camera, sigh).

.

IMG_1965.

Mix in the quick oats a little at a time, and very lightly.  Don’t mush it together.  Be gentle.  🙂

At this point I add the flax seeds, ground cinnamon, and either vanilla or almond extract.  (I love almond extract!)

.IMG_1967

.

Shape into a small ball.  I got 10 out of one batch, but you can make them bigger or smaller, whichever you prefer.

.IMG_1971.

Flatten out gently and shape into a patty.  (These cookies do not spread out).  You can also place each small ball on the cookie sheet and use a glass to flatten out a bit.

Now is when I prefer to add the “goodies”.  On this batch, I placed the dark chocolate chips and small pieces of walnuts on each cookie as I shaped them in my hand.

.

IMG_1973.

I used a greased, 12 inch pizza round because it fits perfectly into my small counter-top oven.

.

IMG_1974.

Bake at 350 for 12-18 minutes.  I actually left mine for 20 mins and they were perfect.

.

IMG_1977.

Have them with tea, coffee, or cold milk.

.

IMG_1979.

You can also add a spoonful of whipped cream, or drizzle left-over cream cheese frosting over the top.  The possibilities are endless!

.

IMG_1980

.

It’s okay to have 2 or 3.  After all, they’re really good for you!! 🙂

.

Have fun baking these!  Let me know if you try them and how you liked them.

Happy snacking,

Daisy

Read Full Post »

Baking bread is just wonderful….


It’s therapeutic for me mixing, kneading, waiting for the dough to rise…


The house smells so good while the bread is baking…


And then you get to enjoy the bread – in my case, I’m giving it to a friend, along with jars of homemade preserves.

I have to say, I love giving homemade food gifts to friends – the look
on their faces,
I can just tell they appreciate it and I’ve brought some joy to their day.

That makes my day!


Here’s the recipe:

Italian Bread

In a bowl, stir:
1 cup warm water
1 Tb sugar
1 packet of active dry yeast
Let stand about five minutes, until it’s foamy.

In a large bowl, mix together:
2 cups bread flour
1/2 tsp salt
Add to the bowl:
the yeast mixture and
2 Tb olive oil
Stir with a wooden spoon
Add up to 1/2 cup of flour until it forms a dough.

Turn onto a floured surface and knead for about 10 minutes.
Shape dough into a ball, place in an oiled bowl and turn to coat.
Cover with plastic wrap and let dough rise for one hour, until doubled.

Head oven to 400 degrees F.
Lightly oil the surface of a baking sheet with olive oil.
On a lightly floured surface, punch down dough and begin to
shape dough, long and tapered as in photo above.
I finished shaping it on the baking sheet so it would be easier to move.
Cover with plastic wrap and let it rise for about 20 minutes.

Use a serrated knife to make three slits in the surface of the loaf,
about 1/4 inch deep each.
Bake 20 minutes until golden brown.

Cool for a bit.
If you like warm bread, slice it while it’s still warm,
spread some butter and honey, or jam,
and Enjoy!

Have fun today.

Bake some bread. 😊

Daisy

Read Full Post »

Homemade Pizza

I was craving pizza last night,

but I’ve been away and haven’t had time for grocery shopping,

so I just used what I had in my fridge & pantry…

IMG_1182


The result was an interesting (but tasty) combination
of some random items I normally would never consider putting on pizza.


I started out by making the dough for the crust.

I actually love this part.

IMG_1160

Peeking inside the bowl…

I love the smell of dough, and when I let it rise
and come back, it’s amazing how it’s doubled it size!


I cover the bowl with a light-weight towel and forget about it for about an hour.


IMG_1161
It’s pretty cool how it grows and becomes so soft.

I love this part, too… Now I get to play with the dough
and form the pizza crust.

It reminds me of playing with Play Dough! 🙂

IMG_1169
When the dough has risen, I put a little bit of flour on the counter
and I either roll it out to the size I want, or I just plop it onto the greased
pizza pan (or cookie sheet, in this case).


IMG_1170

I like this part, too!  I use my fingers to softly spread the dough
over the cookie sheet.

Someday I’ll buy a pizza pan!
IMG_1171
These are the simple ingredients I used on the curst.


IMG_1172
First, I sprinkle garlic powder over the crust,
then I spread olive oil on that.


IMG_1173
Then I pour some of the sauce…
Sometimes I make my own sauce, but this time I just decided to make things easy.


IMG_1174

I use this cheese for sandwiches…

I’ve never used this one on  pizza before, but it works well
if you like some heat.

I think it would’ve worked out fine…
…but I also put some hot chiles (in lieu of red/green peppers)…
In my defense, …I was tired, hungry, sleepy, exhausted,…
I wasn’t thinking.
…let’s just say the pizza was HOT!
But delicious.


IMG_1165

These are the toppings I came up with in my limited pantry:

Corn (I know! I know! It’s not traditionally a pizza topping, but…
I was desperate,…what can I say?)
Black beans (same excuse as with the corn)
Chiles (I didn’t have any red or green peppers so I thought this was the next best thing)
Black olives
Meatballs (Leftover from last night’s dinner) Cut into quarters.


IMG_1175

After the cheese, I put the meatballs…


IMG_1176Then the corn…

IMG_1177
Black beans,…


IMG_1178

Black olives, and green chiles…


IMG_1179
I’m SO glad I had this cheese!!

I sprinkled it all over the pizza.


IMG_1181

It actually looked pretty good.

I baked it for about 20 minutes at 425 degrees.

IMG_1183

I was surprised at the flavor.

I didn’t expect it to be so spicy
—-(I’d forgotten about the cheese slices underneath everything)

I didn’t expect to like the mixture of the toppings as much as I did.
—-(maybe the fact that I was so hungry had something to do with it?)


IMG_1184

 The crust was crispy on the outside and soft on the center.

It was tasty and just what I was craving.

Not as good as the Pizzeria, but a little healthier.  🙂


IMG_1182

It’s really not difficult to make pizza
and it’s fun!

Hope you’ll give it a try!

Daisy


RECIPE FOR PIZZA CRUST:
1 cup warm water
1 envelope active dry yeast
1 Tb sugar

I warm the water in the microwave;
warm enough but not hot.
Then I add a tablespoon of sugar to the water,
add the yeast, and use a whisk to mix it well.
Let it sit for about 5 minutes, until bubbly.

While the yeast is working, I mix the dry ingredients:
3 cups bread flour
1 Tb sugar
2 Tb olive oil

Add the wet ingredients to the dry, until a dough begins to form.
Transfer to floured surface and knead until soft and smooth.
Place in greased (with olive oil) bowl, and let rise for one hour.
Remove from bowl and either roll dough or use fingers to desired
shape in pizza pan or cookie sheet.

Top crust with your favorite toppings and sauce.
Bake for 20 minutes at 425 degrees, in preheated oven.
Enjoy!

Read Full Post »

Apple Pie

Apples were on sale again…


image


I just had to make a pie.


image


The filling is just apples, cinnamon, nutmeg, and butter.


image


It turns into the most delicious sweet and tender filling.


image


The crust gave me a little trouble this time…

But since I wasn’t going for perfect….

I was ok with it.


image


The smell of apple pie baking in the oven. . .


image


You just can’t hardly wait for the pie to be done . . .


image


. . . So you can take it out and have a piece.


Enjoy the apples while they’re in season!

Daisy


Apple Pie

6-7 apples peeled, cored, and sliced
1/2 cup brown sugar
1 tsp cinnamon
1/2 tsp nutmeg
6 Tb butter

Pie Crust (you can either make your own or use frozen)


Read Full Post »

Cornbread

I have been missing out all these years…

IMG_0797.JPG

A cast iron skillet makes cornbread (among other things) so much better!

IMG_0799.JPG

IMG_0801.JPG

IMG_0806.JPG

IMG_0800.JPG

I know, I know, …where have I been?!
Everybody, EVERYBODY has a cast iron skillet.
Except me.

But now, (thanks to my daughter, who helped me see the benefits) I will be getting one.
Very soon.
Maybe even before I unpack all those boxes from our move? . . .

Happy cooking,
Daisy

Read Full Post »

Whenever I’m on the road,  away from home,
I try to find time to go to local Historic Downtowns…
I love going in and out of little shops,
(although I mostly do window shopping).


image

My favorite has to be the little antique stores…
I especially enjoy when I get to go with my daughter
because we both love history and we ooh & ahh
over the old stuff, wondering who it belonged to
and what their story was.

One of the things I’ve enjoyed getting are Cookbooks…

image


I never pay more than $3 for one…


image


I found these for .10 each at a Library Book Sale.


image


I’ve been looking for this one for a long time!
Couldn’t believe it was only $2.50.

image


I took the book jacket off and I like the hardback cover so much more!

image


I was so excited when I found this one…
I’d been looking for a Rachael Ray cookbook for ages.

image


These magazine-style ones are usually between .25-$1.00.
I got this one because it had lots of cheesecake recipes…

(My husband loves cheesecake, and I love him, so…)

image


Next time you’re driving through a small town,
check out the historic downtown…
you might find something that you can take home 🙂

Happy Hunting!

Have a blessed weekend!

Daisy

Read Full Post »

Older Posts »